Touch UI

Labels
AJAX(112) App Studio(7) Apple(1) Application Builder(245) Application Factory(207) ASP.NET(95) ASP.NET 3.5(45) ASP.NET Code Generator(72) ASP.NET Membership(28) Azure(18) Barcode(2) Barcodes(3) BLOB(18) Business Rules(1) Business Rules/Logic(140) BYOD(13) Caching(2) Calendar(5) Charts(29) Cloud(14) Cloud On Time(2) Cloud On Time for Windows 7(2) Code Generator(54) Collaboration(11) command line(1) Conflict Detection(1) Content Management System(12) COT Tools for Excel(26) CRUD(1) Custom Actions(1) Data Aquarium Framework(122) Data Sheet(9) Data Sources(22) Database Lookups(50) Deployment(22) Designer(177) Device(1) DotNetNuke(12) EASE(20) Email(6) Features(101) Firebird(1) Form Builder(14) Globalization and Localization(6) How To(1) Hypermedia(2) Inline Editing(1) Installation(5) JavaScript(20) Kiosk(1) Low Code(3) Mac(1) Many-To-Many(4) Maps(6) Master/Detail(36) Microservices(4) Mobile(63) Mode Builder(3) Model Builder(3) MySQL(10) Native Apps(5) News(18) OAuth(8) OAuth Scopes(1) OAuth2(11) Offline(20) Offline Apps(4) Offline Sync(5) Oracle(10) PKCE(2) PostgreSQL(2) PWA(2) QR codes(2) Rapid Application Development(5) Reading Pane(2) Release Notes(180) Reports(48) REST(29) RESTful(29) RESTful Workshop(15) RFID tags(1) SaaS(7) Security(80) SharePoint(12) SPA(6) SQL Anywhere(3) SQL Server(26) SSO(1) Stored Procedure(4) Teamwork(15) Tips and Tricks(87) Tools for Excel(2) Touch UI(93) Transactions(5) Tutorials(183) Universal Windows Platform(3) User Interface(338) Video Tutorial(37) Web 2.0(100) Web App Generator(101) Web Application Generator(607) Web Form Builder(40) Web.Config(9) Workflow(28)
Archive
Blog
Touch UI
Friday, January 8, 2021PrintSubscribe
Reading Pane
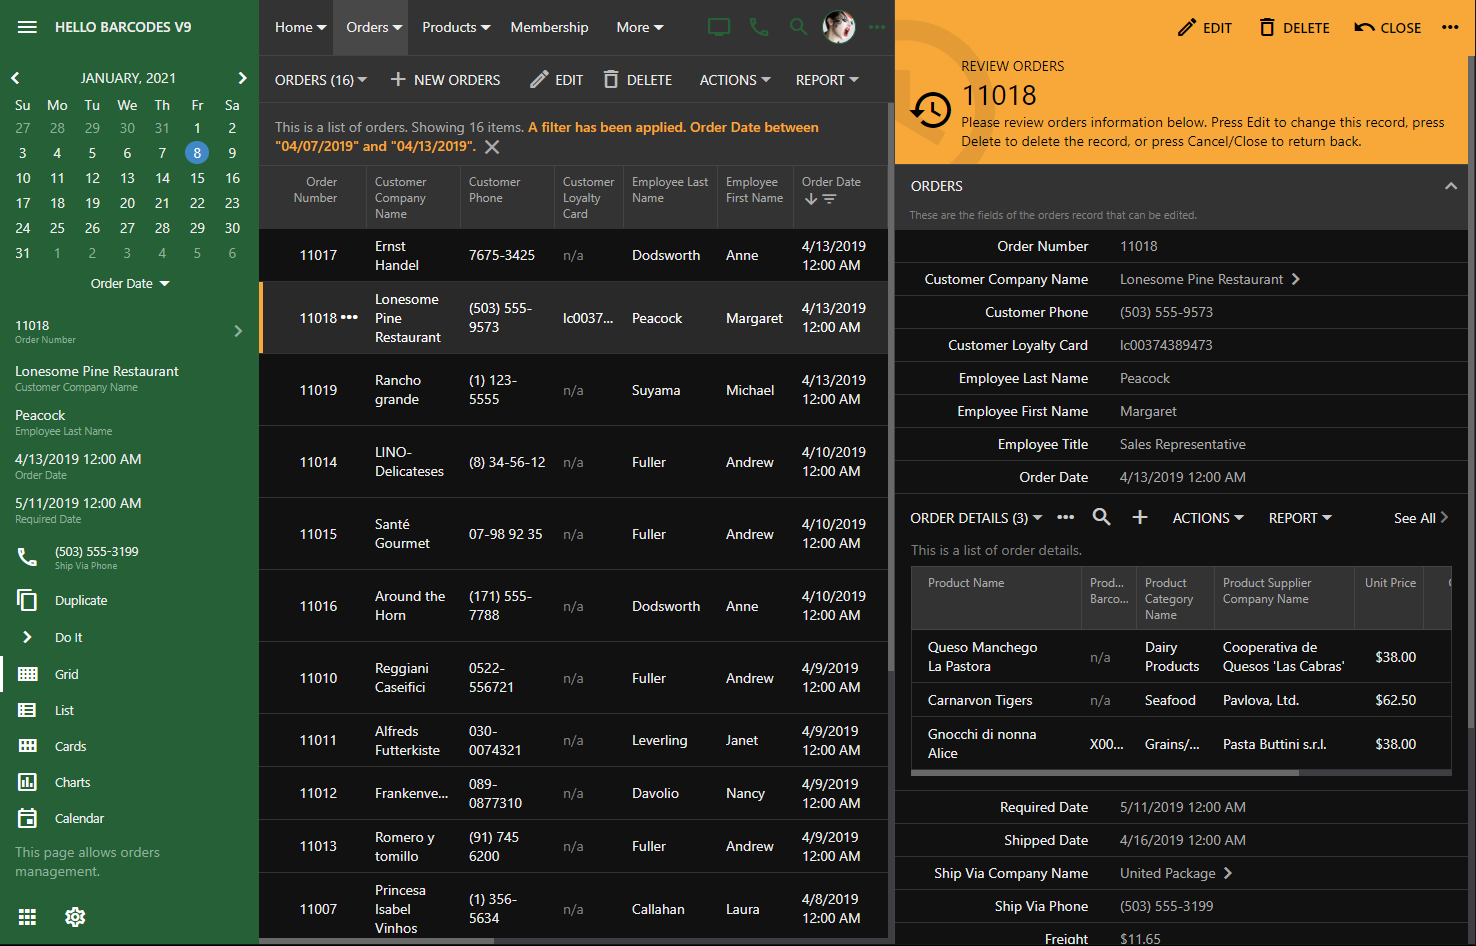
Touch UI provides the built-in option to display the details of the selected record side-by-side with the master list.

Reading Pane

Popular email applications have proven this presentation style to be very effective. The end user can view the details of the selected message and has the quick access to the contents of the inbox.

The prototype of this presentation style has been a part of the framework for the past two years. Our team was able to bring it to the production state just now. The technical challenge was to provide a simultaneous access to the master and detail panes each holding a virtual page of the Touch UI application. A consistent styling has also been worked out.


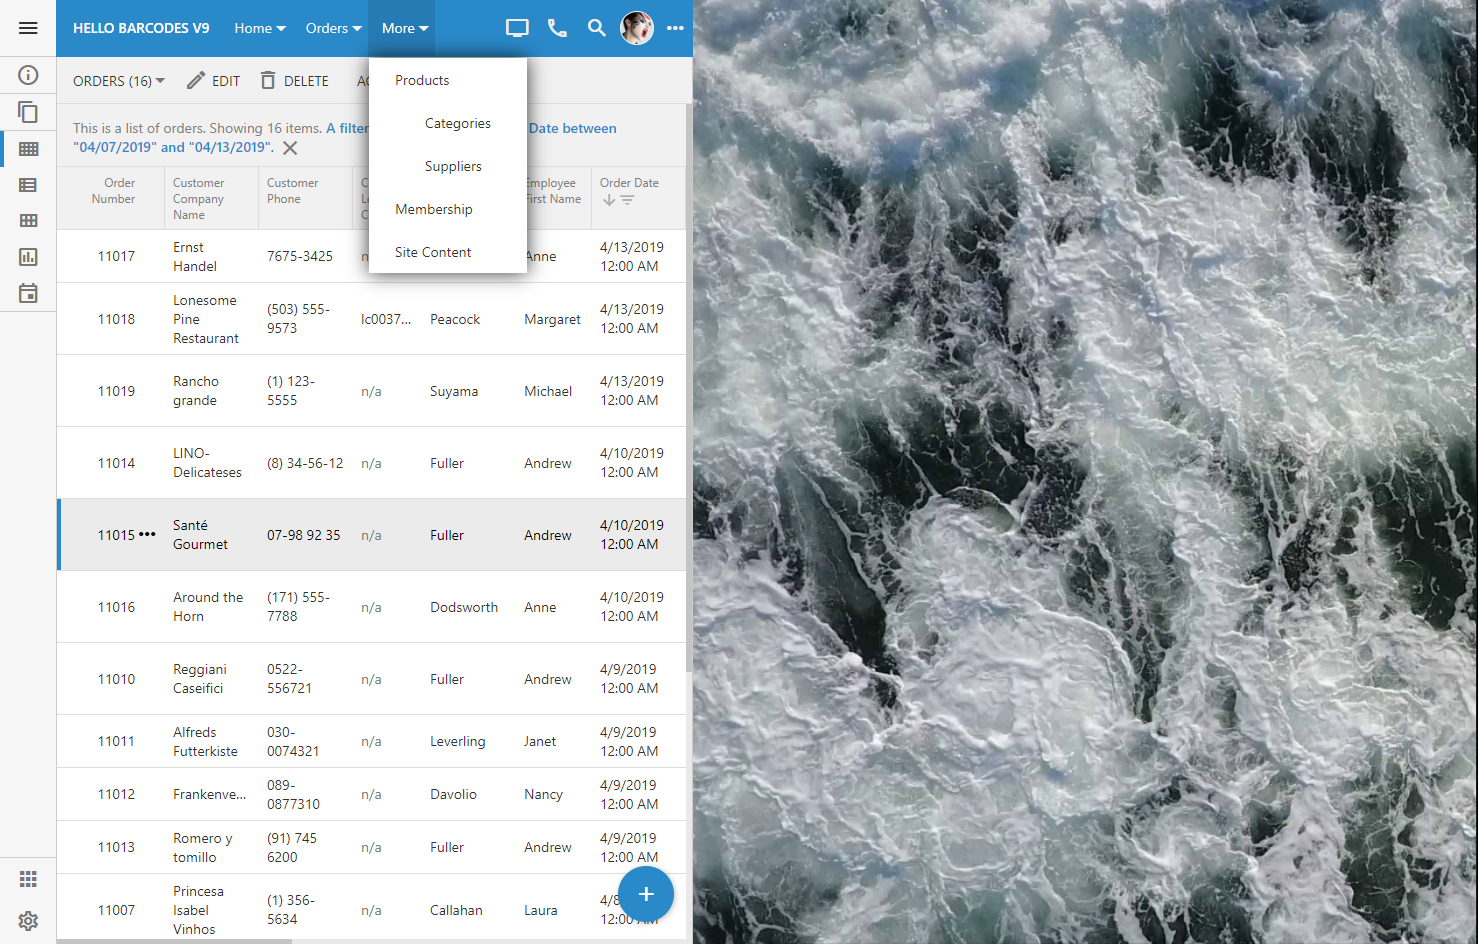
The reading pane detail is empty by default. The placeholder area is filled with the standard background image that can be changed in ~/touch-settings.json through the ui.readingPane.background parameter. Set the option to false to disable the image or specify your own alternative (for example, ~/images/app-bkg.jpg).


The modal form fills this area when a selection is made in the master list or a new item is created. Both master and detail panes can be scrolled and are fully interactive. The familiar form buttons are migrated to the top of the detail pane and have icons to complement the toolbar of the master pane.
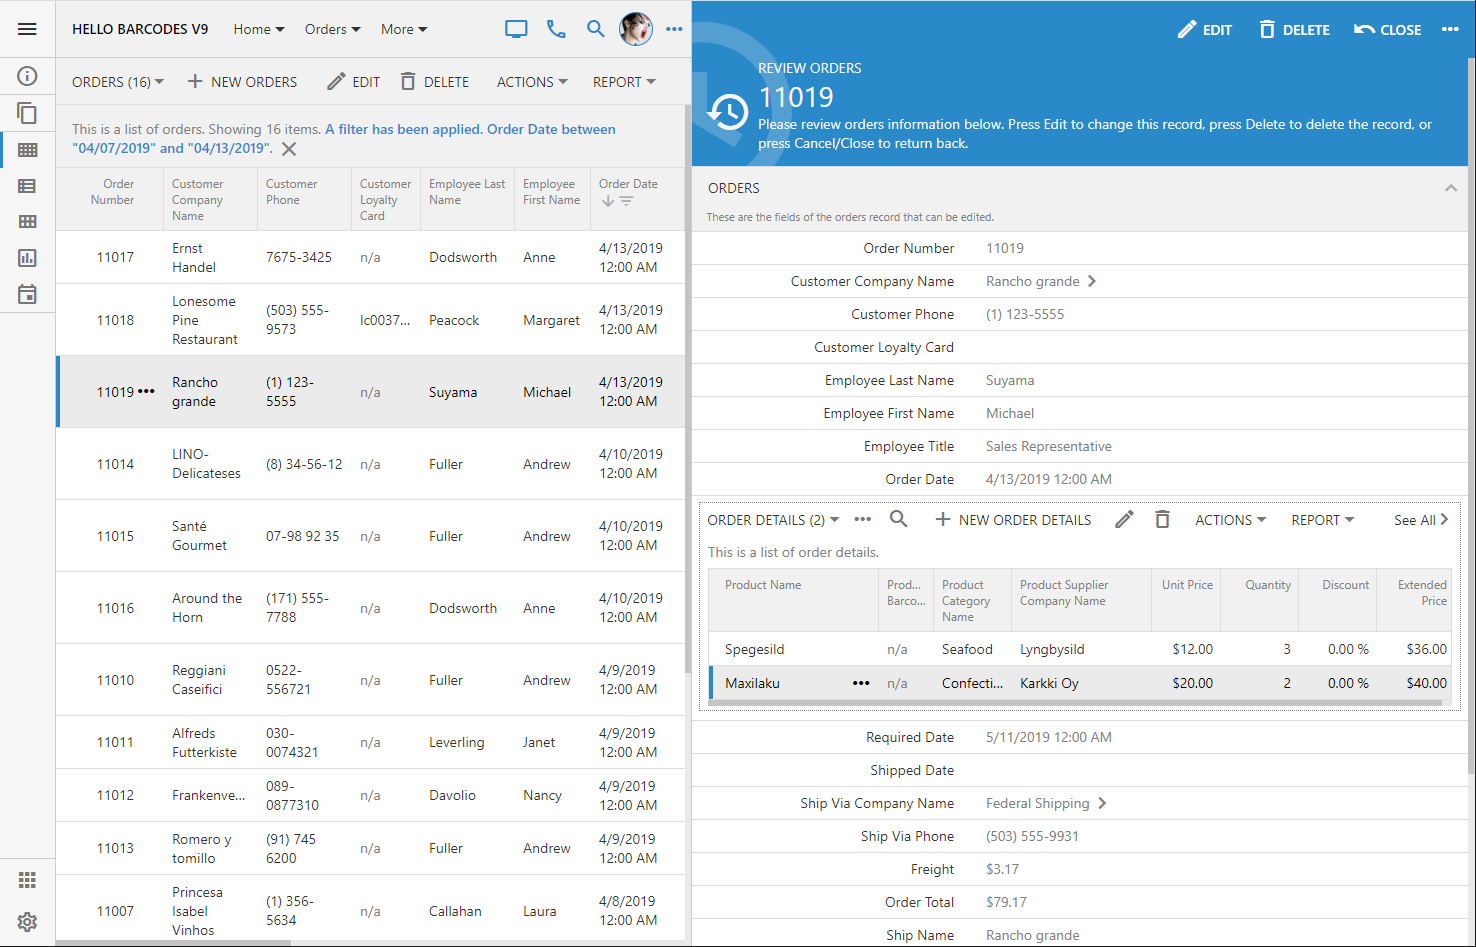


Set the option ui.actions.form.icons to true to enable action icons in all forms of the app. By default, only the form buttons in the reading pane are rendered with icons.

If the reading pane is not enabled then the familiar modal presentation will take place when the user is interacting with the master list.


Any forms activated from the detail pane are displayed on the top of the reading pane.


The option to enable the reading pane is available to the end user through the view selector if the screen size is that of a typical tablet. Developers can also tag the data view on the page as reading-pane-auto to activate the reading pane by default. The option and the mode are not activated if the screen is small.


Touch UI allows specifying the default minimal size of the reading pane master and detail in ~/touch-settings.json through the options ui.readingPane.minLeft, ui.readingPane.minRight, ui.readingPane.minTop, and ui.readingPane.minBottom. The default value for these options is 375 measured in pixels.

The device with the vertical orientation will display the reading pane detail at the bottom of the screen.


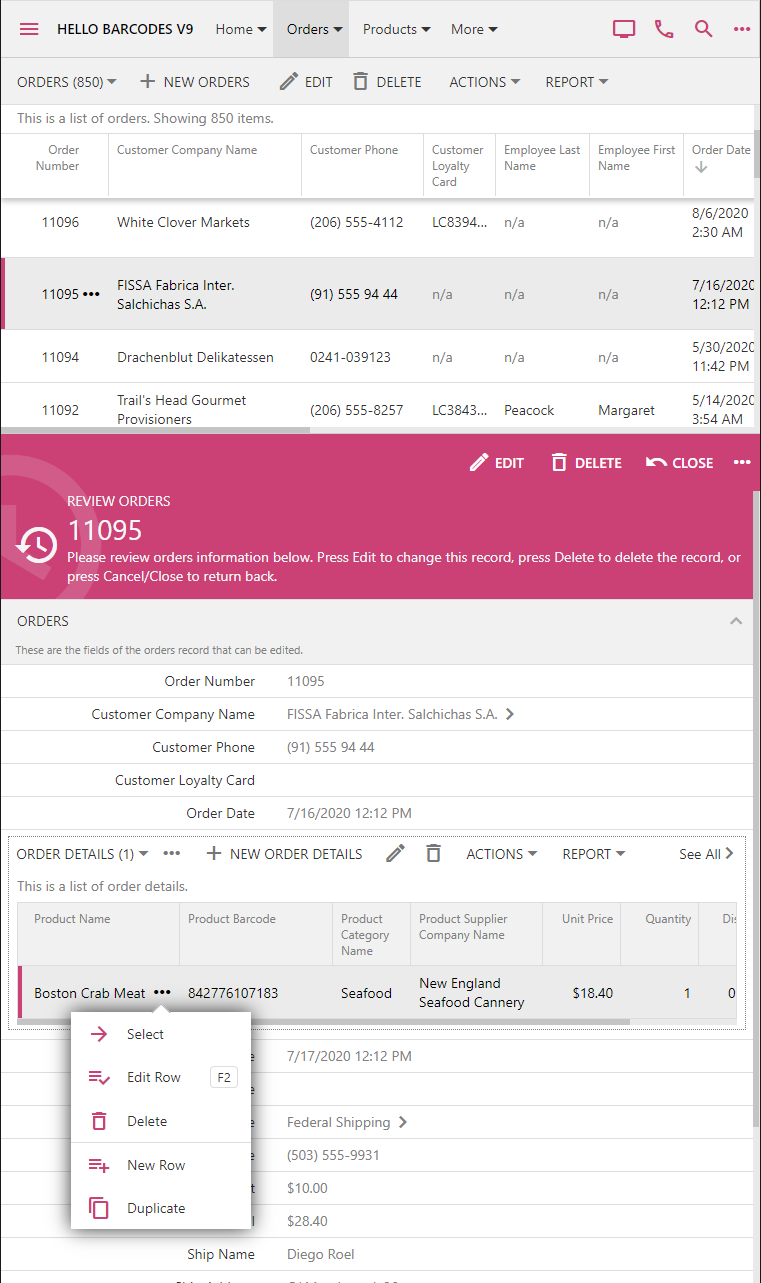
The master pane displays all supported presentation styles.


Hover over or touch the middle divider and drag it to the desired position to change the panes.


The responsive Touch UI will present the data in the best way possible within the available space of master and detail panes.


The reading pane mode enhances the productivity of the end users and requires zero effort on the part of the developer. If for any reason this mode is not desirable, then disable it with ui.readingPane.enabled option in ~/touch-settings.json. The reading pane mode is available only on the pages with a single master dataview.
Wednesday, May 22, 2019PrintSubscribe
Removing Header Text from Views
The responsive user interface of apps created with Code On Time is intuitive.  Nevertheless the grids and forms do display generic text to provide basic user instructions.

This is an example of a grid view with the header text displayed above the data.


This is how the data form may look.


Each description can be changed individually in the Project Designer.

If you prefer a minimalist user interface then the descriptions may appear to be excessive. The unique architecture of apps created with Code On Time makes possible altering various aspects of an app with a just few lines of code.

For example, enable shared business rules in your app by selecting the corresponding option in Settings | Database Model & Business Logic | Shared Business Rules section of the project configuration. Re-generate the app. If you have existing custom "code" business rules, then open each rule and change the base class from BusinessRules to SharedBusinessRules.

Application framework will create an instance of SharedBusinessRules class or a custom version of it whenever a client request is processed through the server-side code. The framework retrieves the XML description of the corresponding data controller to handle the request.Then it provides the app with a chance to perform changes to the in-memory copy of the data controller. If the matching business rules class indicates that it supports data controller virtualization (customization at runtime), then the customization code is invoked. By default, no customization is performed. Developer can override virtualization code to make changes to the controller.

The header text definitions in views of data controllers are as shown in this sample:


Changed the file ~/app/App_Code/custom/Rules/SharedBusinessRules.cs as follows:

namespace MyCompany.Rules
{
    public partial class SharedBusinessRules : MyCompany.Data.BusinessRules
    {

        public override bool SupportsVirtualization(string controllerName)
        {
            return true;
        }

        protected override void VirtualizeController(string controllerName)
        {
            NodeSet().SelectViews().SetHeaderText(string.Empty);
        }
    }
}

Save the code file and observe that all views in the app are displayed without descriptions:


You can customize your data controllers selectively by inspecting the name of the data controller specified in the argument of VirtualizeController method.

Take you minimalist presentation even further by removing category descriptions in form views with this code.

protected override void VirtualizeController(string controllerName)
{
    NodeSet().SelectViews().SetHeaderText(string.Empty)
        .SelectCategory("c1").SetHeaderText(string.Empty).SetDescription(string.Empty);
}

Your forms will now have an even more streamlined data-only presentation:


Tuesday, February 12, 2019PrintSubscribe
Sort Order of Item in Data Lookups
This is the view createForm1 of Products controller. Lookup field CategoryID is configured as a radio button list. Each list item represents a row from Categories lookup table. Items are sorted in an alphabetical order.


The data model of Products controller is based on the table with the same name. A foreign key consisting of CategoryID column is referencing Categories table. Field CategoryName is borrowed from Categories table to be displayed as an alias of Products.CategoryID.


If a dedicated model for Categories table is created, then the app builder will produce a corresponding controller and configure Products.CategoryID field as a lookup.

App builder will set Items Data Controller property of CategoryID field to "Categories", Data Value Field to "CategoryID", and Data Text Field to "CategoryName". Both fields are referencing the fields of the controller specified as a source of items.

Field Items Data View property is left blank by default.


Categories will be ordered by CategoryName when selected from Categories table if Items Data View is not specified.
Set Products / Fields / CategoryID / Items Data View to "grid1". This will force your app to take into account the sort expression of Categories/views/grid1 view. If the sort expression is specified, then the items will be ordered accordingly.

You can set up sort order and sort type directly in the Categories model. For example, you can configure the model to sort categories in descending order.


Alternatively, select Categories/views/grid1 view and enter "CategoryName desc" without quotes in Sort Expression property.

Generate the app and observe the new sort order of categories in the lookup.


Note that the custom sort order will also apply to any other style of lookup.

Consider adding a numeric column to Categories table to have a a data-driven custom sort order.
Continue to Home Page and Toolbar