Let’s create a simple inventory management application with the help of Code On Time app builder. The app will run in the default web browser on the development machine. The same app will allow the native installation. The app will work in the offline/disconnected mode when configured with the Offline Sync.
This tutorial requires the basic database management skills only. If you know how to create tables and select data with SQL, then jump right in!
Download and install the development web server Microsoft IIS Express and the Code On Time App Builder before you begin.
Database
The app builder supports several database engines. This tutorial will work with any edition of Microsoft SQL Server. Create the new database in the cloud hosted in Microsoft SQL for Azure or your own server on-premises. You may need to contact your database administrator to get this done. Make a note of the database connection parameters, such as the server address, username, and password.
Alternatively get the free version of the powerful Microsoft SQL Server Express and install it on the development machine. You can skip creating the database since it can be done from the app builder.
This is the database schema of the inventory management system that we are implementing.
 The diagram of the back-end application database implementing a simple inventory management system.
Building Online App
An online application has its back-end published to a web server. Users interact with the application front-end in browsers. Both are represented by a collection of files stored together in the web server file system. Code On Time creates applications with the complete front-end and back-end code. The development machine plays the role of the server.
Creating Project
Run Code On Time and start creating a new application. Enter Inventory Manager as the project name and press Create. The first page of the project configuration wizard will be displayed. Proceed with the default settings to the Database Connection configuration.
Connection String and Database Configuration
Keep the Sql Server as the Data Provider and click the “more” button next to the Connection String input.
If you are using Microsoft SQL Express as your database engine, then enter .\SQLEXPRESS as the Server address. Press Test to confirm the connection. Enter northwind-db1 in the Database field and press Create to create the empty database.
If you are working with the hosted database engine, then enter its connection parameters. Press Test to confirm the connection and choose your database name from the drop down menu.
Select Northwind under the Sample Tables and proceed to Install. Sample tables will be created and populated with data. Wait for a confirmation message to appear.
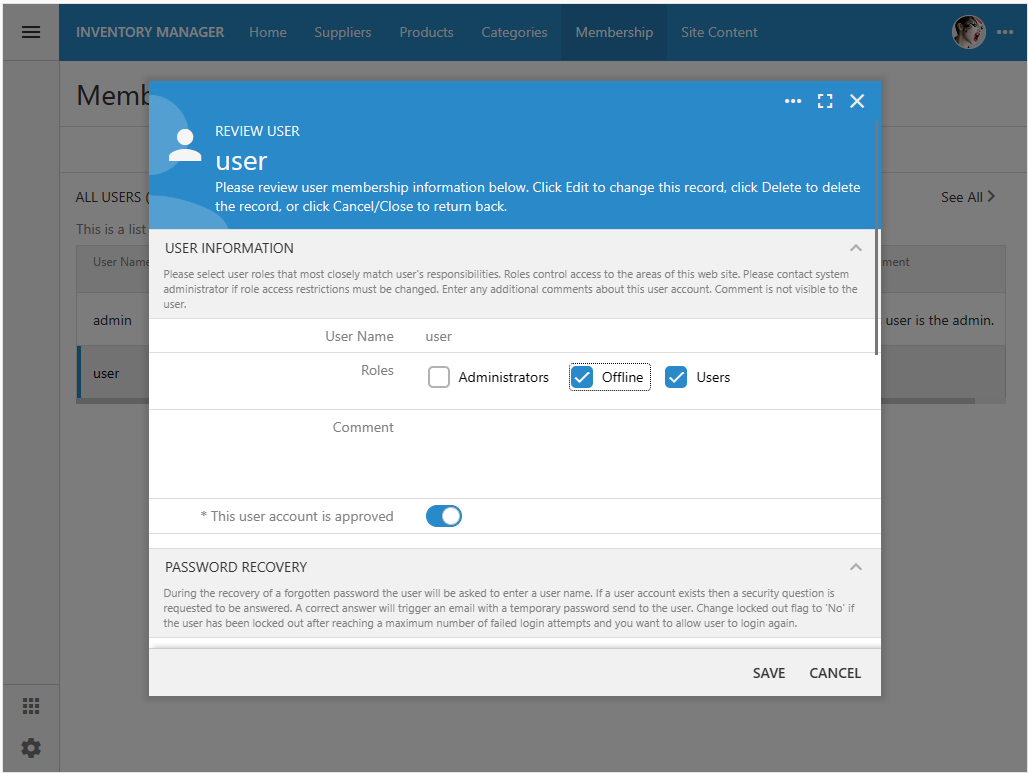
Press the Add button under the Membership section to install the security system. Three tables will be created to maintain users, roles, and their relationships in the database. This step is required.
Users must be authenticated and assigned the “Field Worker” role to work in the offline mode.
Optionally press the Add button under the Content Management System section to install the single-table Content Management System. The table is used in the apps created with Code On Time to keep track of various runtime settings. This step is required if you plan to take advantage of the built-in RESTful API Engine or enable the Single Sign-On with the external OAuth providers.
Press the OK button to finish the configuration of the database and its connection string.
Press Next to configure the data models.
Data Models and App Preview
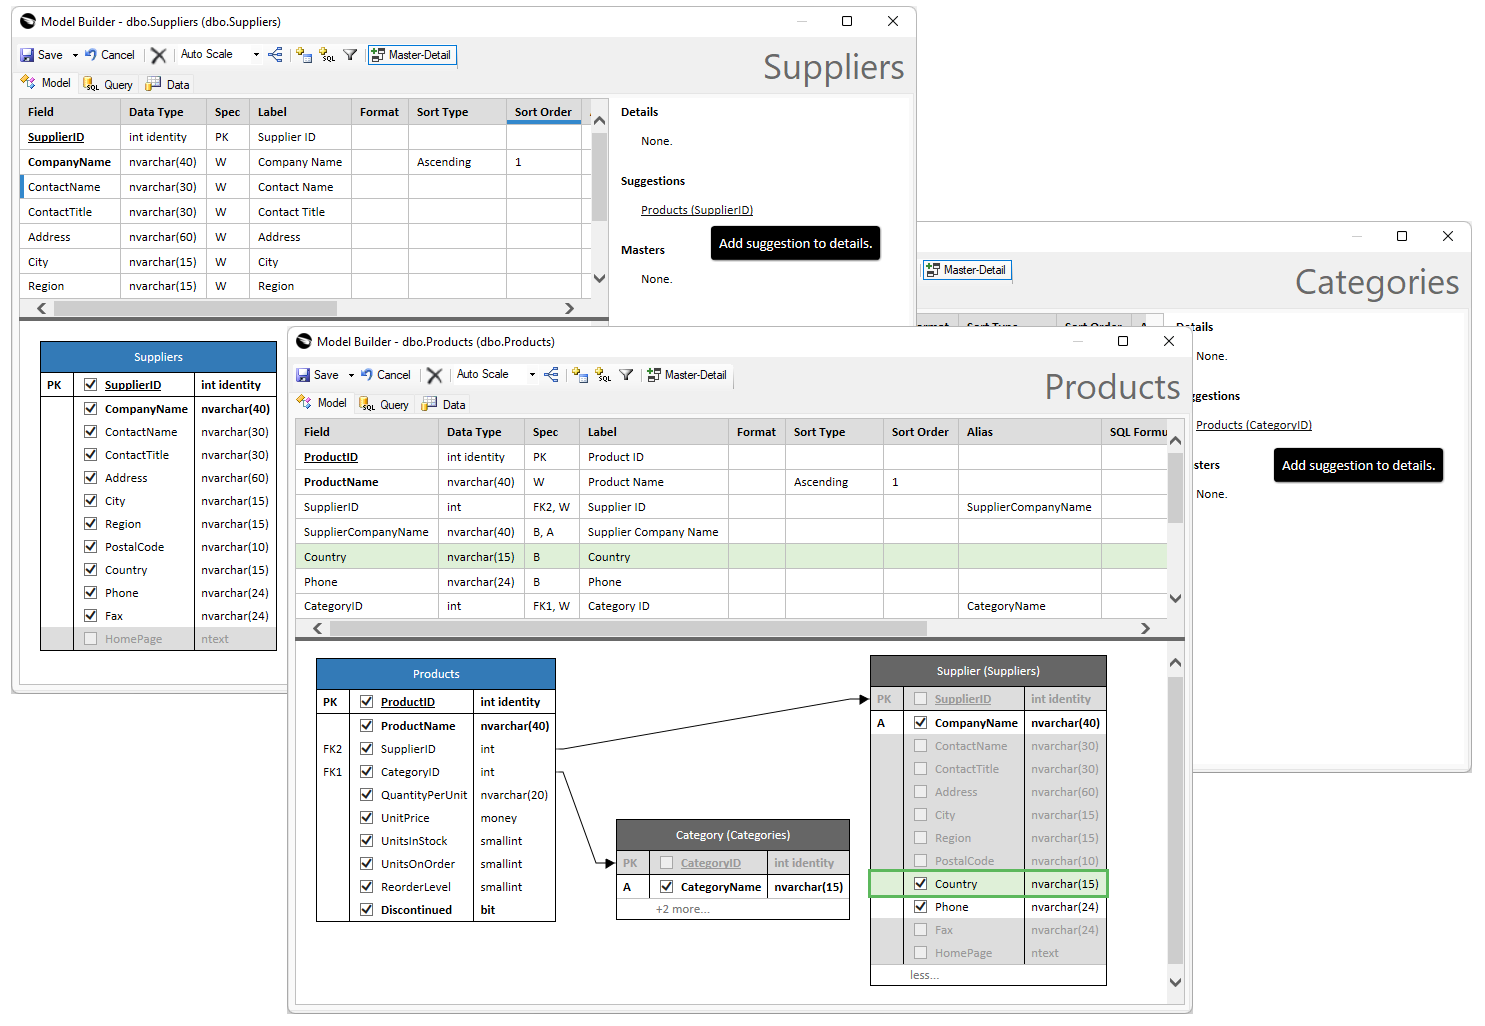
The sample database schema defines the Suppliers, Products, and Categories tables. These tables are the foundation of the inventory management system that we are building. Now it is the time to define their models.
Developers create the data models from the database entities with the help of the Model Builder. Available entities are automatically discovered by the app builder. Developers can preview the application as soon as the models are defined.
The data models are the building blocks of applications. Create models and preview the app as explained in the Inventory Manager Example.
 The data models of the Inventory Manager provide the building blocks for the application. The app is ready to be previewed and deployed without any additional customization.
The preview of the app is displayed in a browser when the app is generated. The app builder will produce a data controller for each of the three models while using them as configuration blueprints. The data controllers are XML files providing the runtime information to the server-side and client-side frameworks of the application (its back-end and front-end).
If you have followed all steps described in the example, then there will be three models and their corresponding controllers in the app. The Products data controller will be in charge of the access to the product inventory. The Suppliers and Categories controllers will have the Products field of the “DataView” type pointing to the namesake controller. The field will provide users with access to the related products.
Your app runs at the localhost address in the default web browser of the development machine. The server-side code is hosted by the development web server Microsoft IIS Express. The app builder launches the instance of this server to preview the app.
Let’s make a few modifications to alter how users are entering data in forms. We will make the data entry appear more natural and help to prepare the application to run in the offline mode.
Data Entry in Online Forms
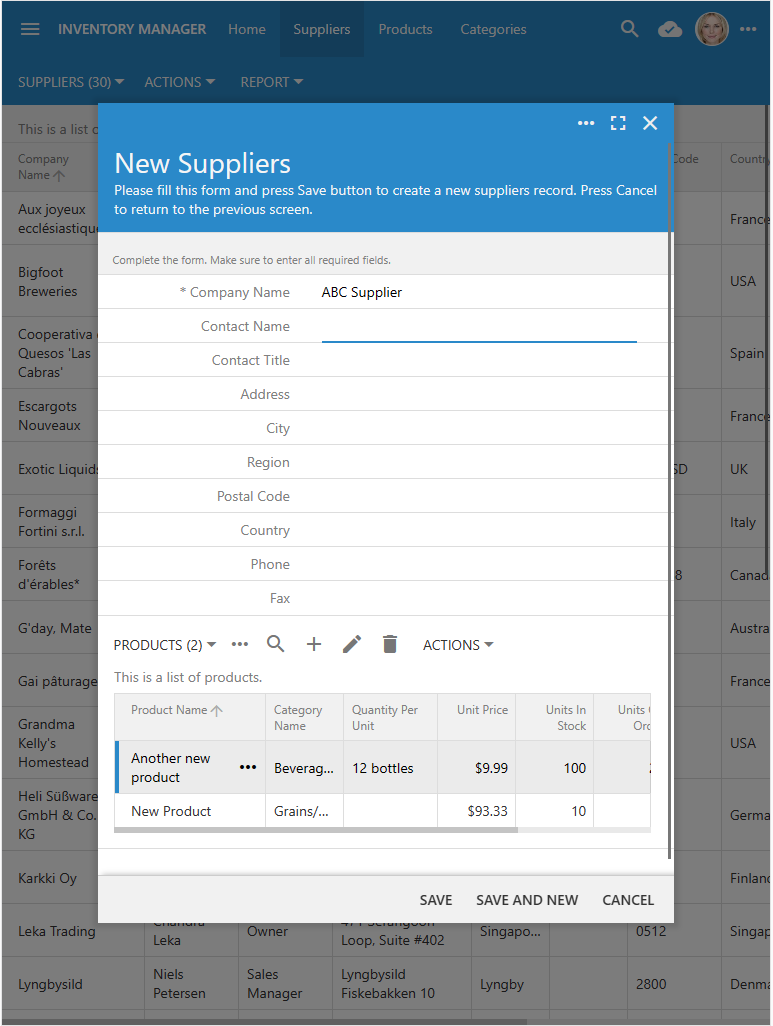
Navigate to the Suppliers page and begin creating a new supplier. Note that it is not possible to enter the products of a new supplier. There is the Products data field in the createForm1 form of the Suppliers controller. Yet it remains invisible. The app needs to get the primary key of the supplier to display the list of related products. The primary key is not known until the record is posted to the database. This is the reason why the client-side framework hides the products in the New Suppliers form.
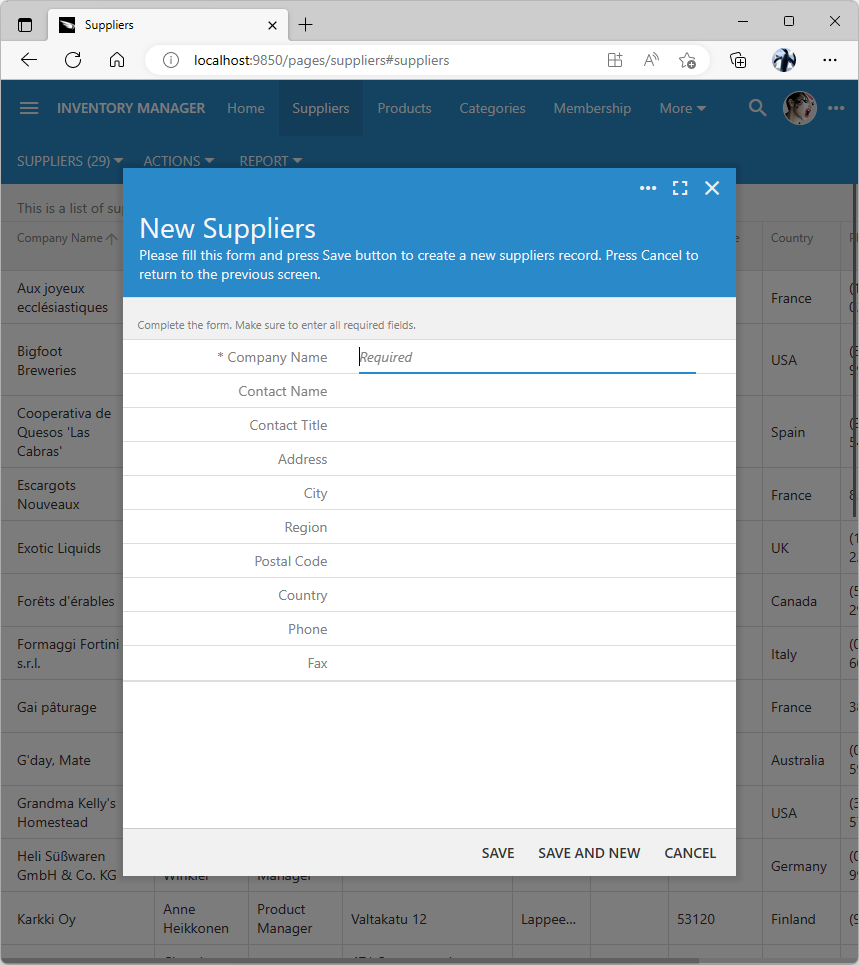 The child "DataView" fields are not visible in the online pages when a new master item is entered. The item must be saved for the details to become available.
Enter the required Company Name and press the Save button. The new row will be inserted in the Suppliers table and automatically selected in the Review Suppliers form. The list of products will be visible since the primary key of the existing row is known to the framework.
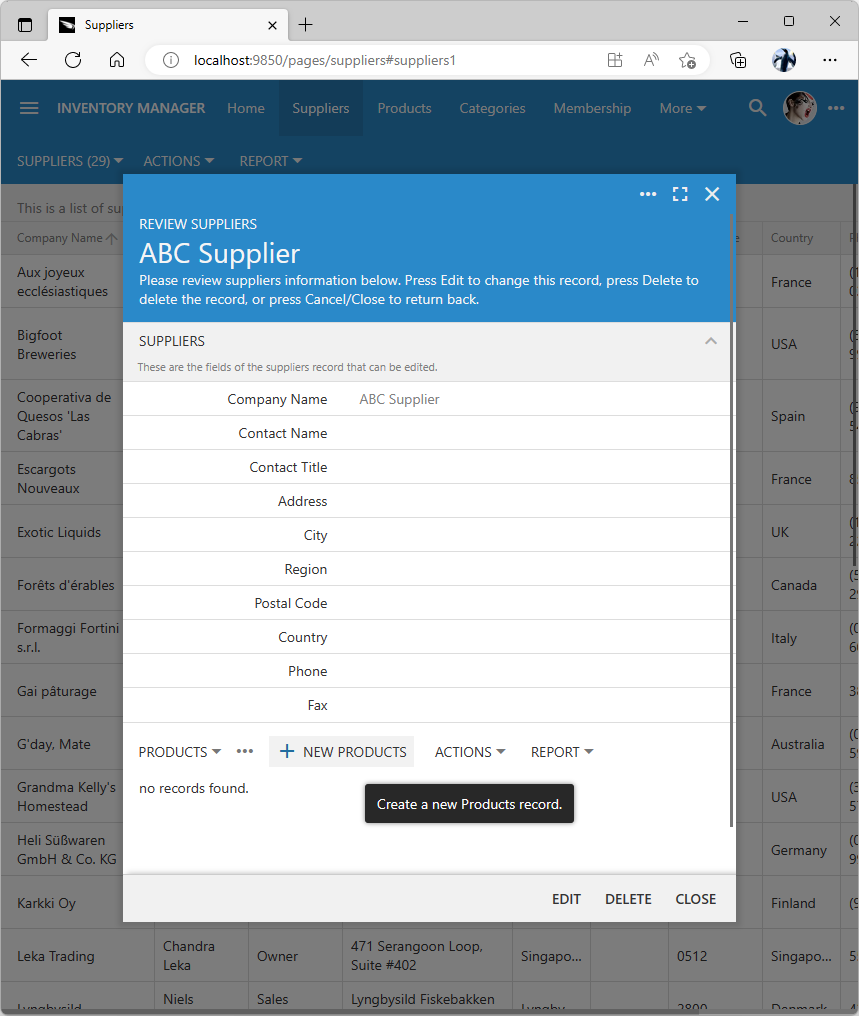 Users may enter products for the existing suppliers. This capability is not available when a new supplier is entered.
By default the data entry commands insert, update, and delete are executed immediately. The supplier row is created in the database table when the New Suppliers form is saved. Related products are added to an existing supplier one at a time in the Review Suppliers form. It is not possible to undo a data entry operation by canceling the parent supplier form.
Data entries are posted immediately upon submission by users. This gives a peace of mind when working with the structured data.
Immediate posting of data does not mirror how we work with the unstructured documents. Multiple changes made in a document or spreadsheet are persisted when users choose to save the file. A more natural mode of entry is to allow adding products when a new supplier is being entered in the system. It is more natural for the supplier and its products to be committed to the database when the form is saved. Users may expect changes to be discarded when the form is canceled.
It is possible to enable the transactional/atomic data entry in apps created with Code On Time. In fact, this is the only method of data entry in the apps working in the “offline” mode.
Transactional Form Processing
Have you ever worried about losing data if your internet flickers while you are filling out a complex form? With Transactional Form Processing, that worry is a thing of the past.
Think of a standard web application like a conversation: you save the customer name, then wait; you add an item, then wait. If the connection drops in the middle, you are left with broken, incomplete records.
Our platform takes a smarter approach. It treats every form you fill out (whether it’s a simple contact or a complex invoice with fifty line items) as a single, sealed 'smart envelope.' When you click Save, the system validates the entire package at once.
- If you are Online: The envelope is delivered and processed instantly.
- If you are Offline: The envelope is safely stored on your device. The Sync icon will change to a 'Synchronize' (Cloud with an Up Arrow), letting you know you have items waiting. When you are ready, a simple tap delivers your pending work.
This guarantees Zero Data Corruption. You will never have 'half an invoice' or an 'orphaned shipping record.' It is all or nothing, ensuring your business data is always perfect, regardless of your signal strength.
How It Works: The Offline Data Processor (ODP)
Apps created with Code On Time have the built-in Offline Data Processor (ODP). The processor is a part of the client-side framework. It allows atomic data entry in the forms.
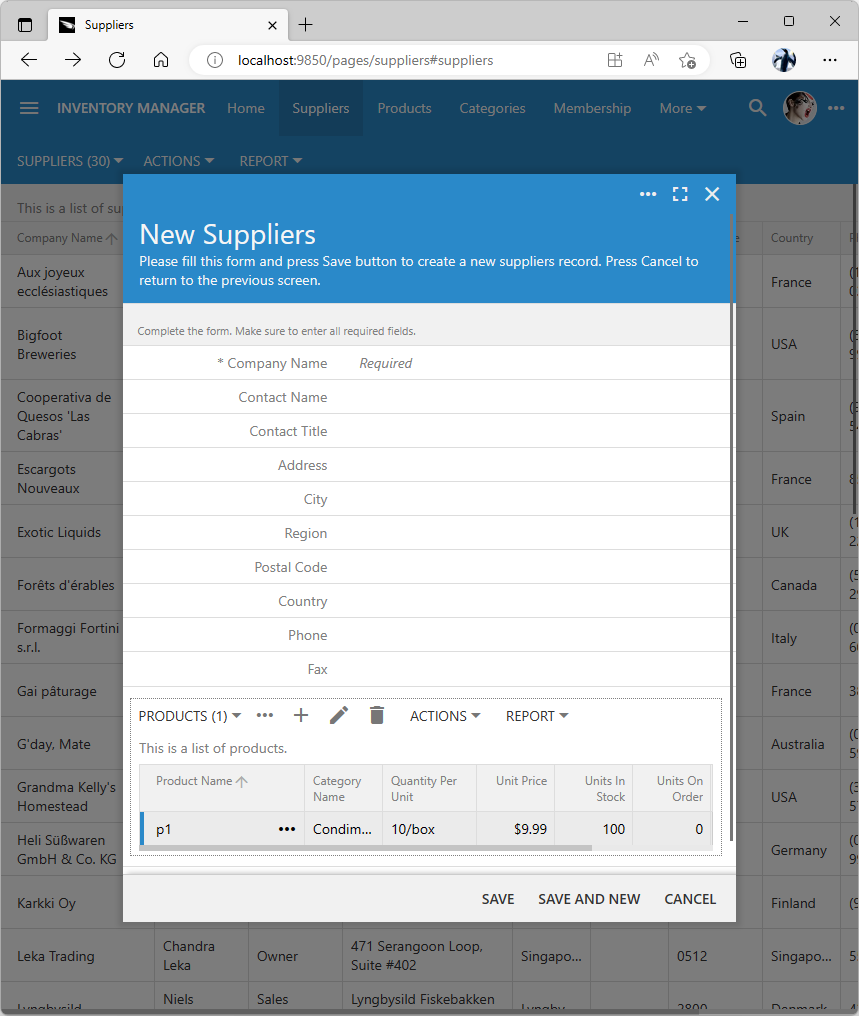
Select the inventory manager project on the start page of the app builder and choose the Design option. Select the Suppliers page in the Project Explorer on the right-hand side of the screen. Mark the page as “offline” and save. Exit the Designer and proceed to generate the application.
Start creating a new supplier. Products are immediately available for entry in the New Suppliers form. ODP is activated on the “offline” pages when users enter new data items or edit the existing ones. ODP maintains the JSON representation of data on the client. The processor assigns the unique temporary IDs to the primary key fields of new items. It also keeps track of the data entry operations performed by users in forms.
 Offline Data Processor enables the atomic data entry on the "offline" pages. Child "DataView" fields are available to enter items in the new and existing master records. Items of the child "DataView" fields is maintained in JSON format. Entries are submitted to the app back-end on the server when the top-level form is saved.
Saving of the top-level form will force the processor to send the log of changes to the application running on the server. The server-side framework begins a database transaction and replays the user data entry operations from the log. If there are no exceptions, then the transaction is committed. Otherwise all changes are rolled back and the error is reported to the user. Users may choose to cancel the top-level form and discard the changed master and detail data items.
Offline Data Processor ensures the atomic data entry for users on the pages marked as “offline”. A complex structured data form turns into an electronic document. Changes are committed to the database when the top-level form is saved.
Follow the steps described above to mark the Categories and Products pages as “offline” in the Project Designer. The atomic data entry will become enabled on the application data-aware pages. Keep in mind that the data items exist in the memory of the app on the client and may not be available to the server-side business rules until the top-level form is saved. Developers will need to write the JavaScript business rules if the client-side calculations on the field values are required.
Here is a draft designed for a sales brochure, feature summary, or executive presentation. It uses a "Smart Envelope" analogy to explain the technical concept of atomicity without the jargon.
Unified Execution Logic
Code On Time Apps utilize a smart "Hybrid" logic. Depending on the user's role and the page configuration, the app automatically switches between direct server communication and local transaction logging.
1. The "Field Worker" Role Experience
Users assigned to the "Field Worker" role experience a unique, "Local-First" workflow designed for speed and reliability.
- "Offline" Pages (Always Local): On pages marked as "Offline" by the developer, the app never waits for the server.
-
- Read: Data is fetched instantly from the local device database (IndexedDB).
- Write: When you save a form, the ODP writes a Transaction Log to the device. It does not try to connect to the server, even if the device has a perfect signal.
- Sync: Use the Sync button on the toolbar to push your Transaction Logs to the server. This gives you total control over when data transmission occurs.
- "Online" Pages (Hybrid Access):
-
- When Connected: If the device has a network connection, "Online" pages (those not marked as Offline) appear in the navigation menu. These operate normally, sending data directly to the server.
- When Disconnected: If the network is lost, the menu automatically redraws to hide the "Online" pages, leaving only the fully functional "Offline" pages available.
2. The Standard User Experience
Users without the "Field Worker" role interact with the application like a standard web app. The ODP still packages their data into transactional "envelopes" to ensure integrity, but these are sent to the server immediately upon saving.
3. Smart Synchronization
For "Field Worker" users, the app toolbar features a permanent Sync button that indicates the current status:
- 'Synchronized' (Cloud with a Checkmark): You are up to date.
- 'Synchronize' (Cloud with an Up Arrow): You have completed work waiting to be sent.
- No Connection (Crossed Cloud): The internet is unreachable, but you can keep working.
When the user taps 'Synchronize':
- Transaction Replay: The server opens a database transaction for each uploaded log and replays the user's actions.
- Smart Row Refresh: Upon successful commit, the server automatically sends back the absolute latest data for the specific rows you modified.
- Full Refresh (Optional): If you need to download the latest application updates or the full dataset for your user account, you can select "Refresh Data" during the sync process.
Developer Configuration Checklist
To enable Transactional Form Processing and Offline Sync in your application, ensure you have completed the following steps in the Project Designer:
- [ ] Enable Membership: Ensure the ASP.NET Membership feature is installed (via the Settings or Database configuration) to manage users and roles.
- [ ] Create the "Field Worker" Role: In the Membership manager, create a role named
Offline. Users assigned to this role will act as "Local-First" users.
- [ ] Mark Pages as Offline: Open the Project Designer, select the specific pages you want stored locally (e.g., Suppliers, Products), and set the
Offline property to Yes.
- [ ] Confirm Edition: Ensure your project is built with the Builder or Enterprise edition. The Offline Sync engine is a built-in component of the application framework. It activates automatically in the apps built with these versions and requires no configuration.
- [ ] Assign Permissions: Assign the
Offline role to the specific users (e.g., field technicians, sales reps) who require disconnected access.
Going “Offline” With Offline Sync Add
Going “offline” may appear as a daunting task. Luckily we have a magic solution called Offline Sync. This optional component will turn an online app created with Code On Time into an app that allows users to work in the offline mode. Offline Sync is enabled in the apps created with the Community and Enterprise editions of Code On Time.
The standard user account offline and the Offline role are created in the app database when the membership is enabled. You can designate the “Field Worker” users in the membership manager. Sign in as admin and navigate to the Membership page. Create the Offline role if needed and assign the role to the user account. Save the changes.
 Users with the "Offline" role will experience the offline mode in the applications that have the Offline Sync Add-on enabled in the configuration.
Logout and proceed to sign in with the user account. The downloading of the front-end files and account data will commence.
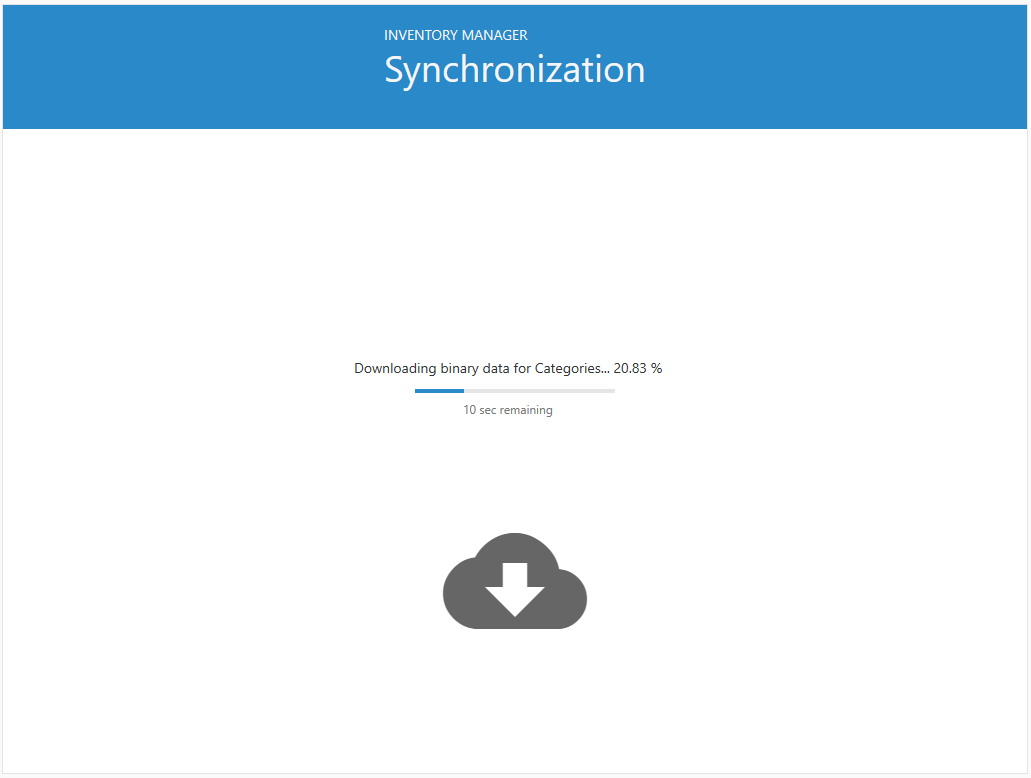 The initial synchronization will begin when users with the "Offline" role are logged into the app with the Offline Sync Add-on. At least one page marked as "offline" must be accessible to the user. Users must log out explicitly to remove their data from the device.
The atomic data entry by users produces a log of transactions when the top-level forms are saved. The log is persisted on the client. The anticipated effect of data entry is simulated on the local copy of data by the offline data processor. Users can search, filter, and sort their data.
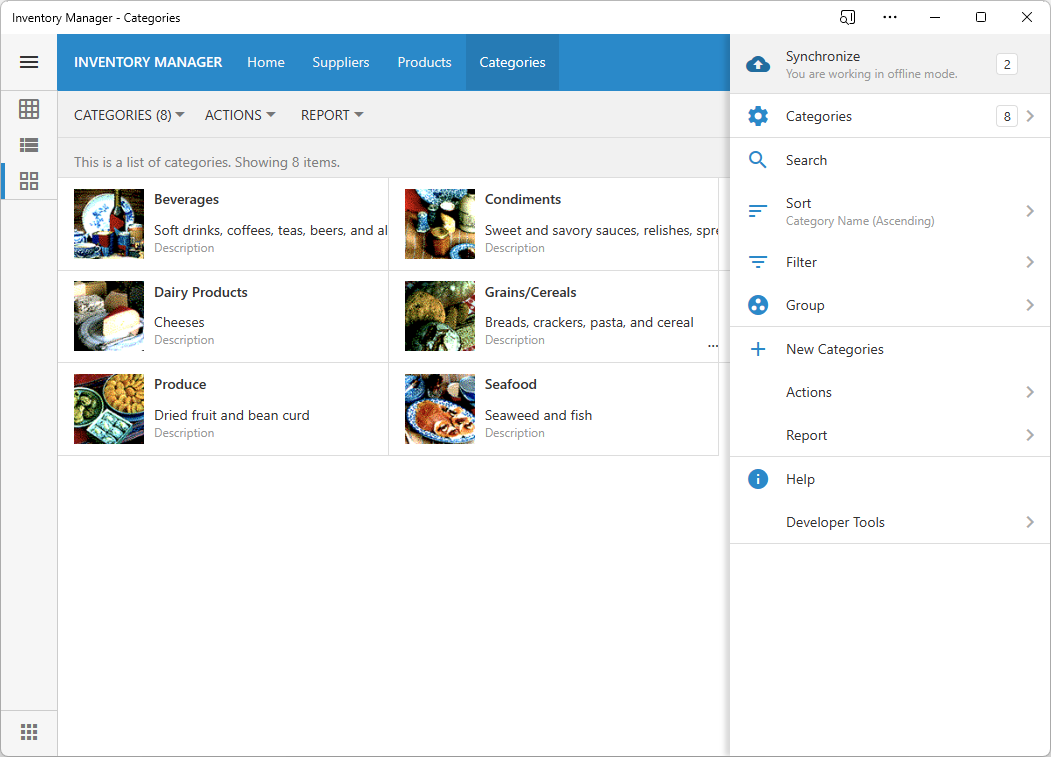
The “cloud” icon is displayed on the right side of the toolbar. The icon will change to reflect the status of the network connection and when there are pending changes that were not synchronized with the server. Tap on the icon will start the synchronization process.
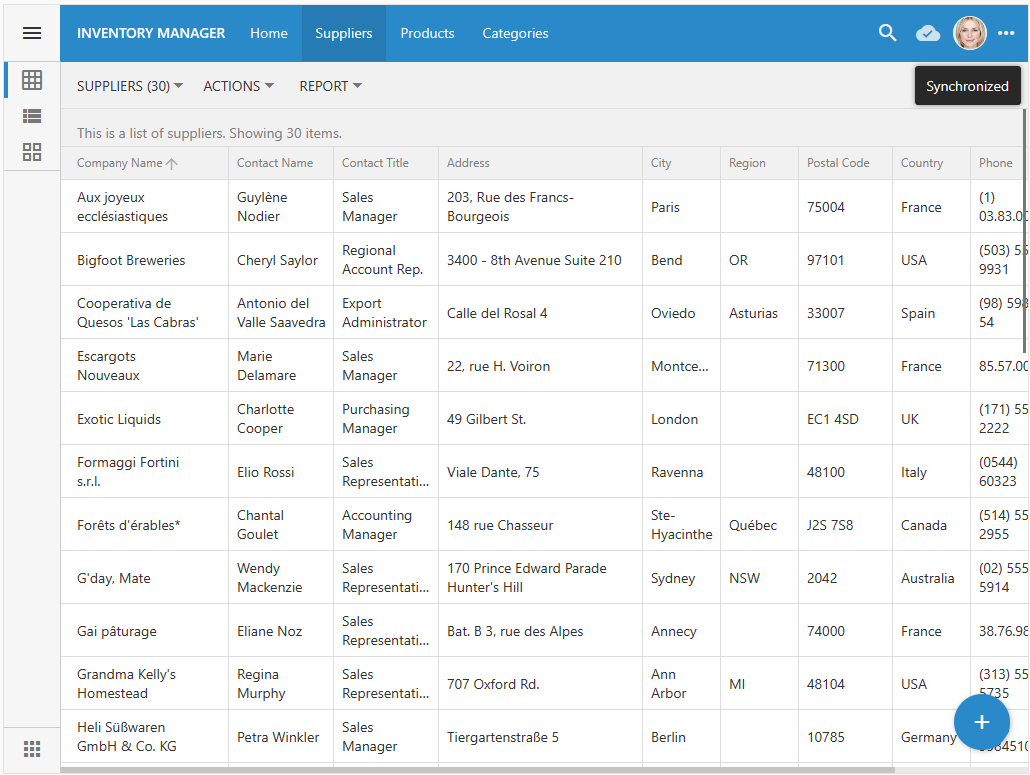 The dedicated icon is displayed next to the user avatar in the toolbar to provide the synchronization status. Tap on the icon will activate the upload of pending changes followed by the optional syncing of app files and user account data.
The synchronization is always available as the first option in the context menu of the app running in the offline mode when there are no active forms. Users must save or dismiss the active forms to start the synchronization.
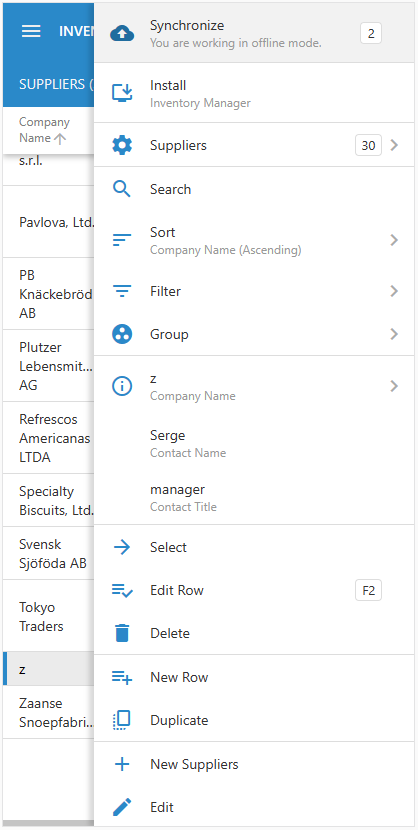 The context menu provides the synchronization command on the online and offline pages if there are no forms opened by the user. Users must save their work in the forms before the synchronization becomes possible.
Synchronization must be attempted when the device has a solid network connection. The pending changes are sent to the app back-end for processing. Each individual atomic data entry sequence is processed in the context of a database transaction. The failure to commit will stop the synchronization and give users an option to either fix the issue or discard the problematic transaction in the log.
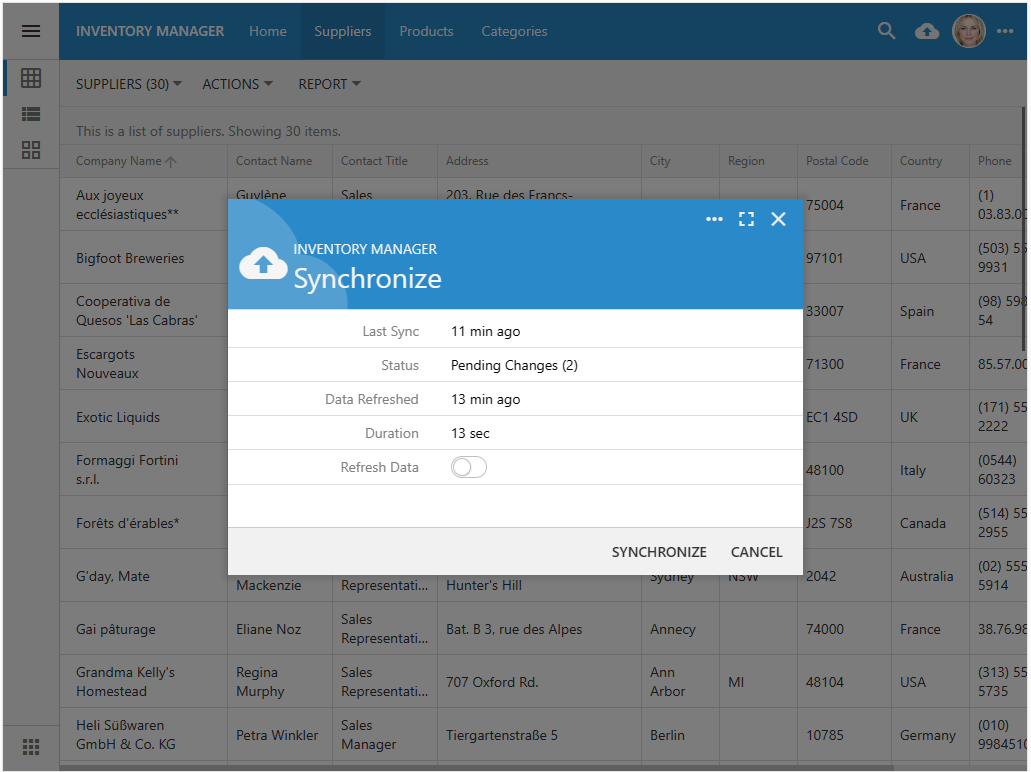 Synchronization prompt provides an option to refresh data. The refresh follows the successful upload and processing of the pending changes. The front-end files and user account data are loaded from the app back-end on the server. Users must take into account the previous refresh duration to ensure that they allocate enough time to successfully complete the sync when the robust online connection is available.
The synchronization prompt provides the Refresh Data option. If the option is enabled, then the entire application and the user account data will be refreshed upon the successful upload of the pending changes. Users must evaluate the duration of the last data refresh since the app will not be available for normal use while the sync is in progress.
The mix of online and offline pages may be available to users in the “Field Worker” role. The navigation menu options are reduced to the “offline” pages when the network connection is lost.
Users will remain logged in up to 6 months without being required to confirm their identity. Only the explicit logout will remove the user account data from the device.
Users will be automatically logged in whenever they visit the online pages of the app. Online pages always come from the server back-end. Offlines pages are served from the local cache. Developers must be careful when making significant changes to the app that has offline users. Presentation of online and offline pages may become inconsistent if the offline users do not perform the refresh during the synchronization for lengthy periods of time.
Installed vs Browser in Offline Mode
Apps created with Code On Time can be installed directly from browsers to run in the native mode. The installed app looks just like the other native apps and has its own icon on the home screen. The “Field Worker” users of the natively installed app will experience the disconnected mode just like they would when working with the app in a browser.
 The installed app will also work in the offline mode without any distinguishable differences with the offline mode in a browser.
The app front-end framework uses the same set of system APIs to ensure consistent behavior across various operating systems. Application is not aware whether it is running in the browser or in the installed mode.
The installed app may have a significantly increased data storage quota allocated by the operating system.
Start building online apps that can be installed natively and run in the offline mode!