Code On Time makes it possible to rapidly build amazing business applications. The framework in their foundation has the RESTful API Engine included. The API security relies on the access tokens procured with the OAuth 2.0 Authorization flows. The native apps, web applications, and devices can easily confirm a user identity with a Code On Time application. Users grant the explicit permission to access their account data for various types of clients.
An application created with Code On Time can be configured to perform the Federated Identity Management (FIM) duties. Any app with the ability to execute HTTP requests can implement the Single Sign-On with the FIM application.
Bespoke Federated Identity Management
The bespoke centralized management of user credentials, roles, permissions, and claims is a powerful tool in the arsenal of a system architect. It takes only a few clicks to transform an application created with Code On Time into a powerful user account management system that facilitates the implementation of the single sign-on and secure sharing of the user information for the widest possible range of applications.
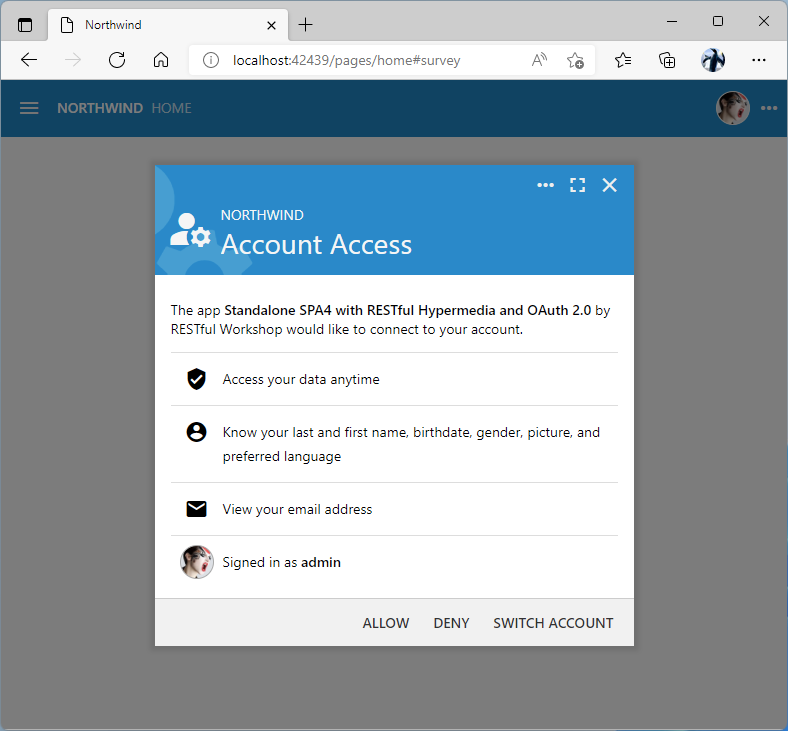
The Account Access consent form is presented to the user during the OAuth 2.0 Authorization flow in the Federated Identity Management application created with Code On Time.
Effortless Modular Applications
Businesses respond to the new requirements by rolling out new application modules that are built with a variety of development tools and technology. Divide-and-conquer approach helps to solve complex problems facing developers. It is easier to build, deploy, and maintain multiple compact applications each addressing a particular business requirement than one monolithic application behemoth. The challenge is to make these applications verify the user identity and access the user-specific data.
Developers can designate a single application created with Code On Time to act as the user identity provider for a collection of apps. The identity provider application performs the user sign-in across the entire application collection built internally and by the third parties. Users enter their credentials once and access the entire application collection without further interruption. The bespoke federated identity manager uses the technology implemented by the industry giants, but without the associated costs and complexity.
Centralized User Directory
The identity provider application maintains a directory of users, roles, and their associations. The directory database can link users to customer accounts, demographic information, permissions, etc. Administrators create users and manage their permissions in the directory. Users can access their data in one place. Changing of the personal mailing address, phone number, contact email, and password can be outsourced to users to reduce the directory maintenance costs.
Single Sign-On
An identity consumer app must be able to construct a URL that will activate the sign-in sequence in the FIM application. It also needs to implement the HTTP-based exchange of the authorization code received from the identity provider for the access and id tokens. The exchange occurs when the account access is granted by the user. There is no need to implement the login form, two-factor authentication, password recovery, or account sign-up in an identity consumer app. In fact, the identity consumer application may be built with the user interface technology best suited for a particular business application module. Even the consumers with the limited input capabilities can sign in their users. The user account data is shared with the identity consumer automatically when the account access is granted. The amount of the shared information matches the scopes specified in the request to authorize access.
Flexible Implementation
The ability to implement Federated Identity Management on a subset of tables in a single database schema or having a database dedicated entirely to the user management is a significant advantage. The FIM-enabled application created with Code On Time will handle both scenarios. Individual application modules can take advantage of the single sign-on even when the user information is stored in the database shared by all application modules.
Huge Savings
There are excellent FIM solutions implemented as online services. They handle numerous authorization flows and offer high availability. The white-lable customization of the user interface and the synchronization of the user account data will require significant investment on the part of the customers of such services. Operation of the FIM service involves monthly recurring fees typically based on the Monthly Active Users (MAU).
Code On Time provides an excellent alternative to the hosted FIM services. A collection of custom business application modules can be powered with Federated Identity Management by designating one application for this purpose. Internal and external applications alike can take advantage of the OAuth 2.0 Authorization flows without the recurring fees.
Developers can prototype the single sign-on and information sharing between application modules with the FIM identity provider created with Code On Time. The move to the hosted FIM service can happen later without costly implementation mistakes.
Configuring Identity Provider
It is simple to configure an application created with Code On Time for Federated Identity Management. This requires a few modifications to the database schema. It must be enhanced with the tables to manage users, roles, and their relationships. The general purpose content management system (CMS) based on a single table must be added to the schema next. A few entries in the configuration file will enable the RESTful API Engine. Finally, application administrators will sign into the application and use the built-in management forms to register the identity consumers. An identity consumer is any client that uses the FIM-enabled application to verify the user identities.
Master Directory of Users
The sample application shows how to implement an inventory management system. Developers are instructed to add the Membership support during the configuration of the database connection string of the project. Adding the membership support to the database will introduce the tables that will keep track of application users and their roles. Application users are required to sign in to access the app data. App builder will produce the standard user interface to manage the master directory of users without requiring any coding or customization.
Developers have an option to use their own custom tables to manage the directory data. Custom user and role management screens are easy to configure with minimal programming.
Content Management System (CMS)
The identity provider application will need a place to keep track of the registered identity consumer applications, access tokens, authorization requests, user pictures, etc. A single click will create one table that will maintain this sort of information in the application database. Follow the instructions when configuring the project database connection string to add the Content Management System to the database.
RESTful API Engine
The built-in RESTful API Engine is the part of the codebase in every application created with Code On Time. It implements the hypermedia-driven API for the application data controllers and several OAuth 2.0 Authorization flows. Developers must enable the RESTful API in the identity provider application explicitly. If there are custom data controllers that are not intended for the API-based consumption, then the access control list must be specified to exclude them from the hypermedia.
Identity Consumer Registration
Applications that will be using the identity provider for authentication of users must be registered in its content management system. This also applies to the application modules created with Code On Time. The SiteContent table will have its data managed in the standard user interface forms designed specifically for this purpose. Application administrators can also use the App Management API to register the consumers.
Sample Identity Provider
Let’s put together a standalone Identity provider application.
Create a project called Identity Provider and add Membership support and Content Management System when configuring the application database connection string. Do not add any custom data controllers and proceed to generate the application.
Click the Develop icon on the App Studio toolbar and change the ~/app/touch-settings.json file as follows to enable the RESTful API engine:
JSON
12345678910111213141516{
  "server": {
    "rest": {
      "enabled": true,
      "output": {
        "json": {
          "indent": true
        },
        "acl": {
          "HideAllControllers": {
          }
        }
      }
    }
  }
}
The server.rest.acl.AllControllersAreHidden key enables the access control list in the RESTful API. It specifies that the controller with the name HideAllControllers is exposed. Most likely there is no data controller with such name and therefore no controllers will be available for the API access in the Identity Provider application. This key is needed if you plan to add more data controllers to the app and do not expect them to be available in the API hypermedia.
The standalone Identity Provider application is ready to authenticate users on behalf of the client apps. It will be providing the Federated Identity Management services with multiple OAuth 2.0 Authorization flows.
The standard Login form will be presented to users when the authorization flow sequence is initiated with the Authorization URL that was constructed by the client application. Users can opt-in to secure their accounts with the 2-Factor Authentication, which will require input of a verification code when the valid combination of username and password is entered on the new device.
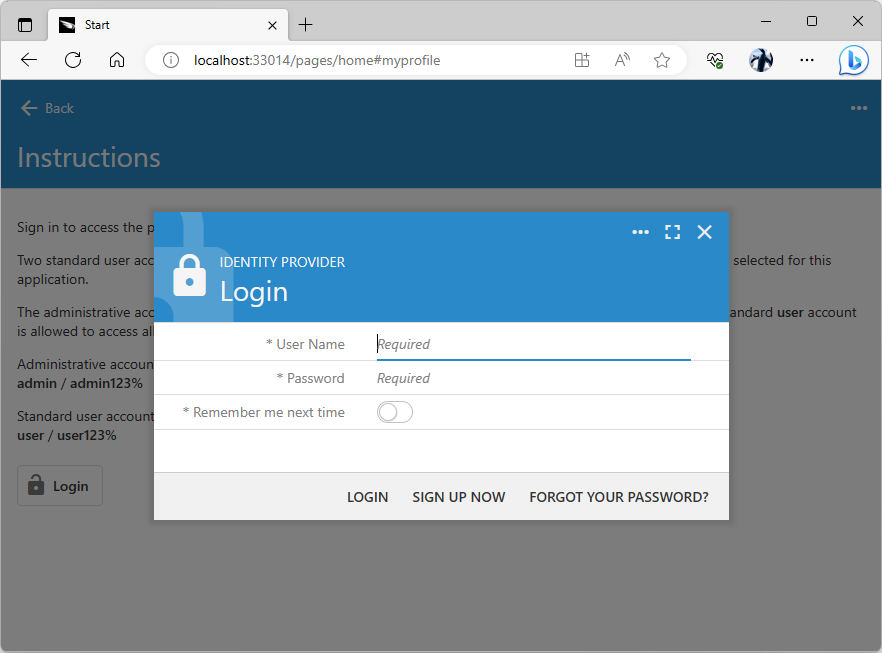
The standard Login from will greet users when a client app begins the authorization flow sequence to confirm the user identity. Developers can put together a custom form to collect the username and password. Users will be required to enter a verification code if the 2-factor authentication was enabled for their account.
Authentication With FIM Provider
The Identity Provider application can be used to perform the single sign-on for the clients built with any tools and technologies. The only requirement is the ability of a client app to execute HTTP requests.
Sample Identity Consumer
Let’s begin exploring the single sign-on with the Identity Provider by building a sample identity consumer app with Code On Time.
Start create the Identity Consumer #1 application by following the steps described in the Inventory Management System Example.
Create a dedicated database for the identity consumer application and have it populated with the sample data. Make sure to add the Membership support and Content Management System when configuring the application database connection string.
Create only the Suppliers data model without the master-detail relationship to speed things up. Also select a non-default theme in the project settings to distinguish this app from the Identity Provider. Generate the app and sign in as admin in its Login form.
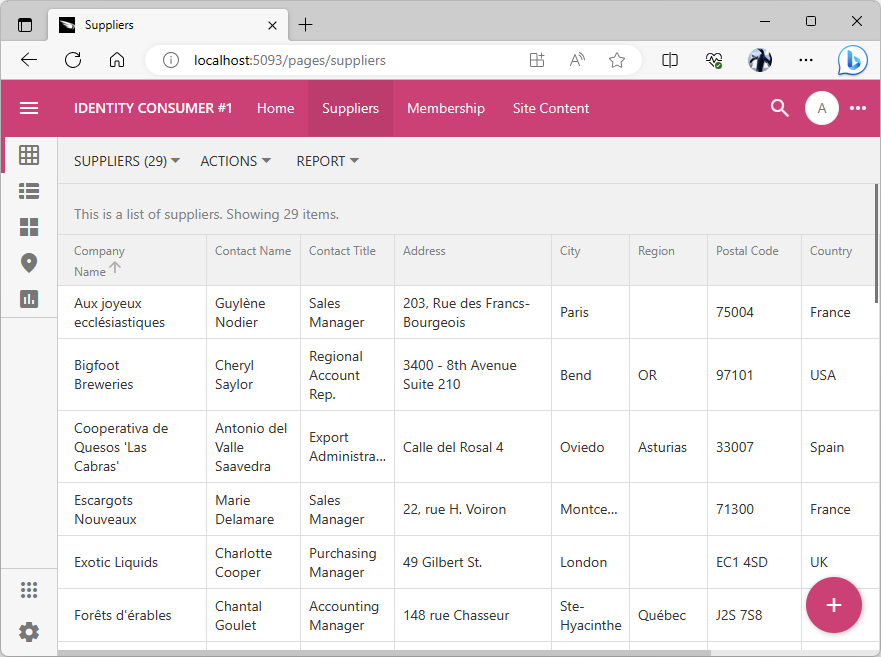
The purpose of the Identity Consumer #1 is to manage the inventory suppliers. Application administrators also have access to the Membership system and the Site Content CMS. Eventually, this app will use the Identity Provider application for the single sign-on.
At this stage we have two independent applications each with its own database and user management.
“Shadow” Users
The identity consumer application administrators are not expected to populate the user accounts on the membership page when the single sign-on with the Federated Identity Management provider is enabled. Instead, the user credentials will be managed in the database of the identity provider application. Users will be transferred to the Identity Provider application to sign in. The provider will redirect back to the consumer when the user identity is confirmed. An authorization code will be embedded in the URL and the consumer will have two minutes to retrieve the user identity information from the provider.
The retrieval of the user identity is virtually instantaneous. It involves the exchange of the authorization_code parameter value for the access and id tokens. The consumer will try to locate the user with the same name that is specified in the id_token. If the user does not exist, then a new user account will be created with the specified username and random password. User roles and the avatar picture will be synchronized with the claims in the id_token.
The “shadow” user record can be referenced in the consumer database via foreign keys. The login process automatically updates the user record to match the user account in the database of the Identity Provider.
Both the consumer and the provider may share the database of users and roles while still taking advantage of the single sign-on. Having dedicated databases may help with the maintenance since the independent backup and restore are possible.
Getting to Know Each Other
Both applications are executing on the localhost address. Note that the consumer app port differs from the port of the Identity Provider.
The Identity Consumer #1 application must be registered with the Identity Provider to participate in the single sign-on. The provider needs to know each consumer of its services.
Identity Consumer CMS
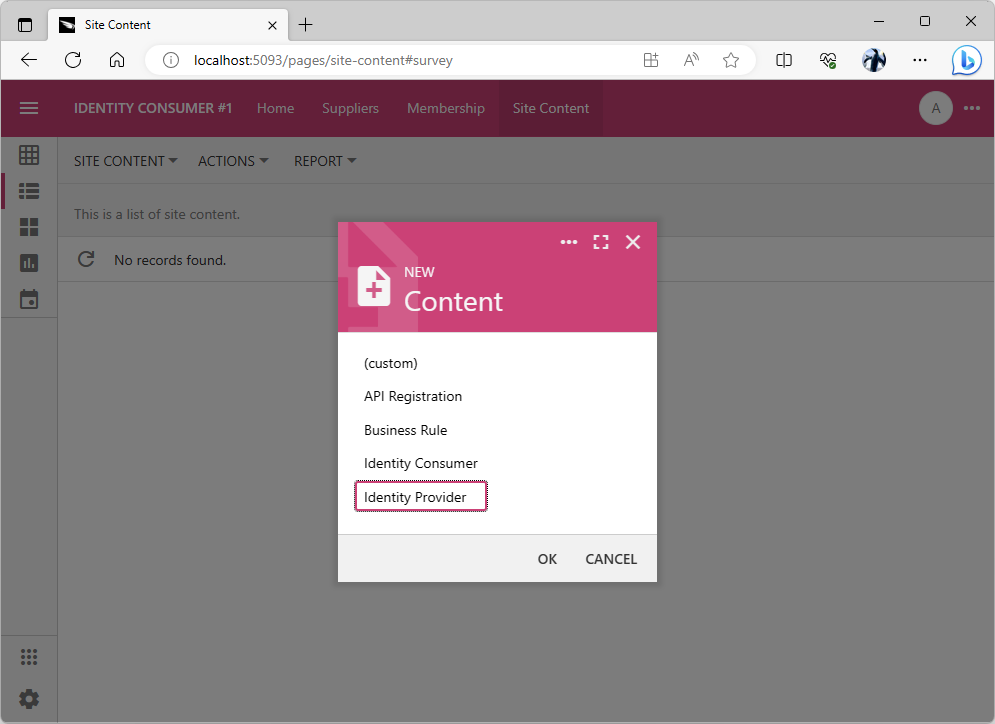
The client app needs to know the location and single sign-on parameters of the identity provider. Apps created with Code On Time keep this information in the content management system. Sign in as admin into the Identity Consumer #1 application and navigate to the Site Content page. Press the floating Add button, choose the Identity Provider in the content menu, and press OK to continue.
Please note that the Identity Provider in the New Content form stands for the type of the CMS content. Coincidentally our identity provider application also bears the same name.
Administrators must create the Identity Provider record in the content management system of the identity consumer application to enable the single sign-on. Multiple identity providers can be registered in the CMS.
Starting Identity Provider Configuration
The OAuth Identity Provider form is displayed when the Identity Provider option is selected in the New Content form. Code On Time applications can use numerous identity providers, such as Google or Microsoft Graph. Select the App Identity option in the list of providers.
Click the Copy icon next to the Redirect Uri field. The URI of the Identity Consumer app will be copied to the clipboard.
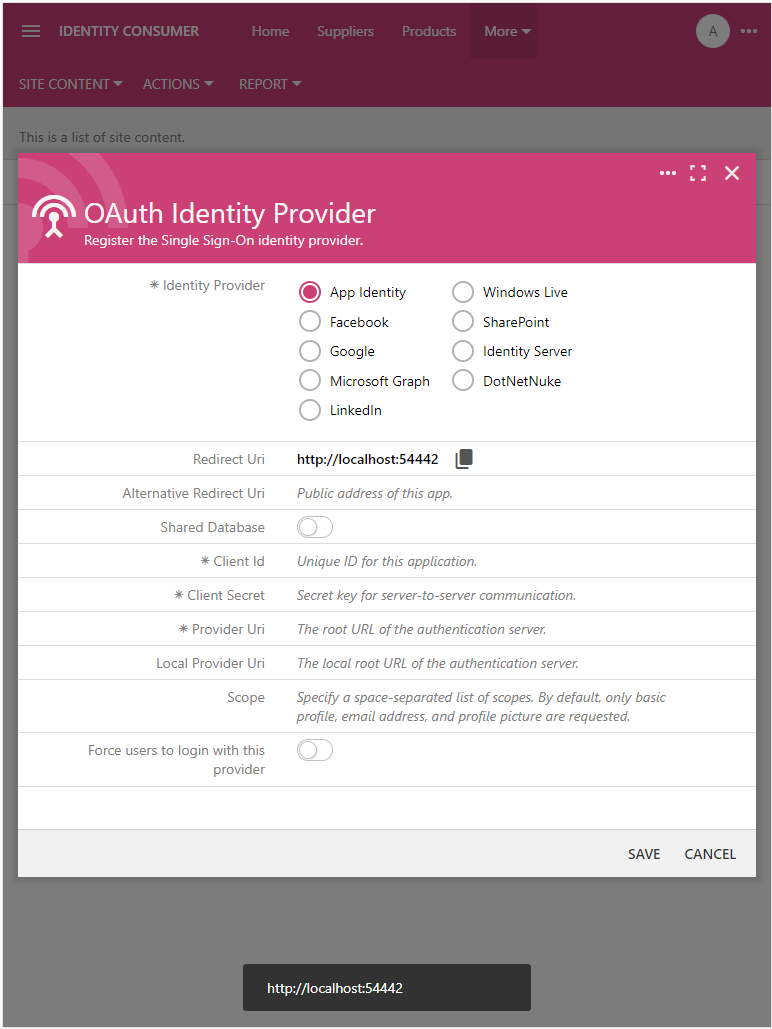
Press the Copy icon next to the Redirect Uri field. The field is read-only. Its value is figured by the Identity Consumer app automatically.
Now you will collect several configuration parameter values from the Identity Provider app.
Registering an Identity Consumer
Sign in with the admin account into the Identity Provider application and navigate to the Site Content menu option. Press the floating Add button, choose the Identity Consumer option in the menu, and press the OK button to continue.
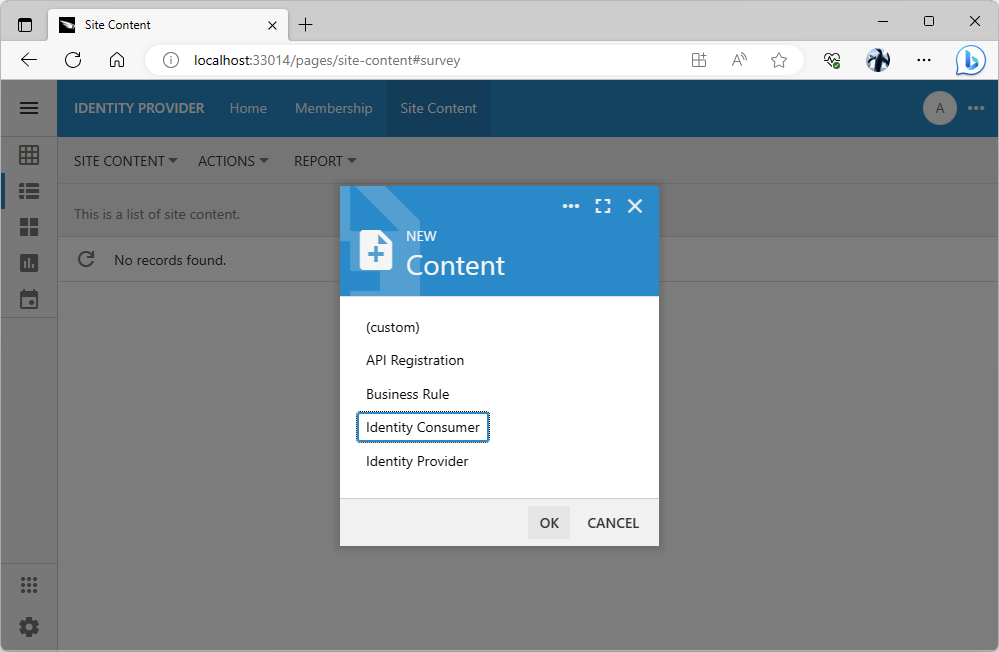
The New Content prompt allows creating the specialized and generic content in the content management system by administrators. Application will search the CMS to locate the user picture, identify consumers, access tokens, etc. The content is dynamically created and changed during various activities such as OAuth 2.0 authorization flows.
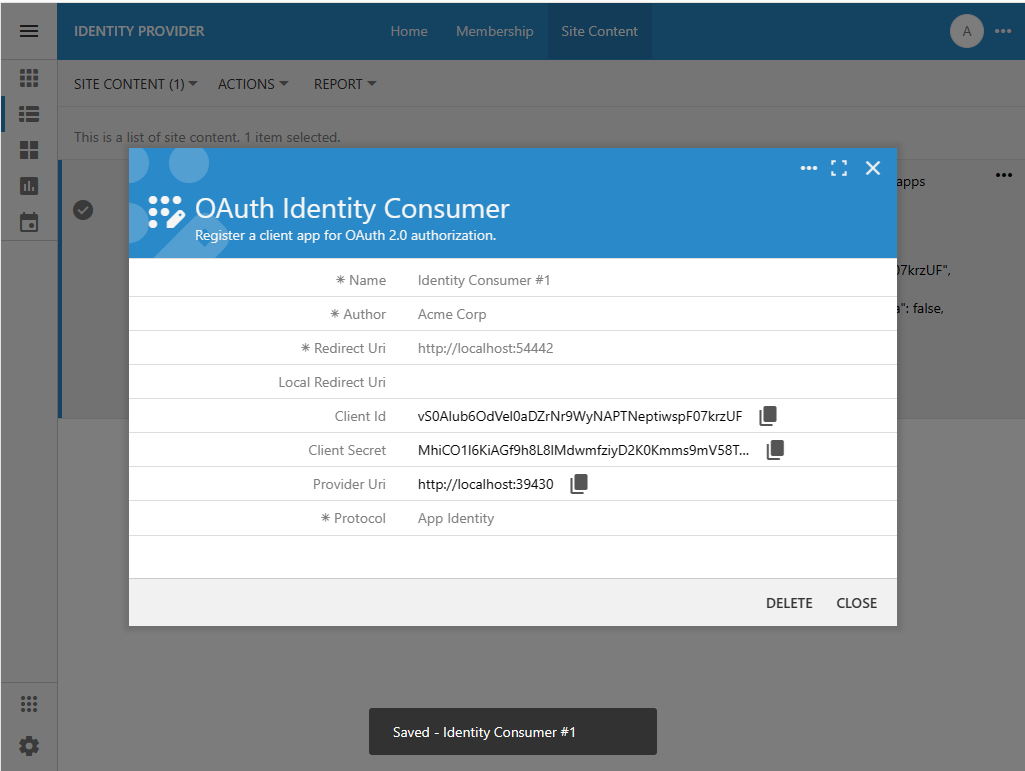
The Client App Registration form is displayed. It requires input of the client application name, author, URL, and the supported communication protocol.
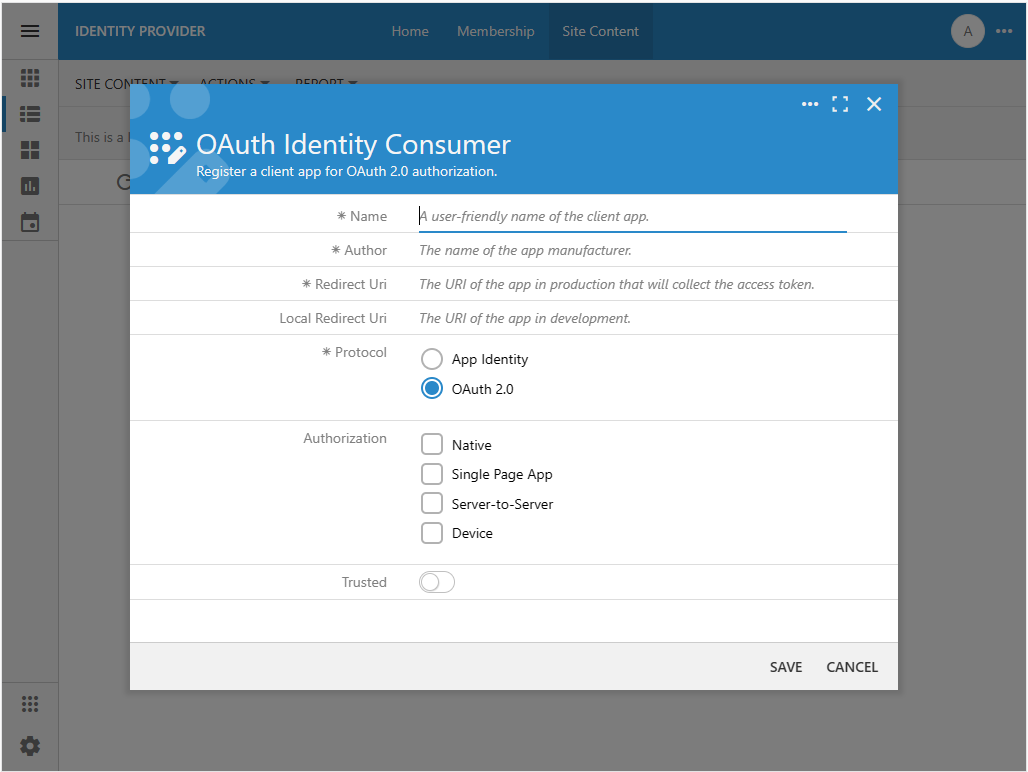
Client app registration requires input of its name and author. This information will be presented to users in the authorization flow sequences. The redirect URIs tell the identity provider where to send the authorization_code when users grant access to their accounts. The type of authorization governs the authorization process and information exchange between the consumer and the provider. If the consumer app is trusted, then users are not presented with the list of authorized scopes for approval during the sign in.
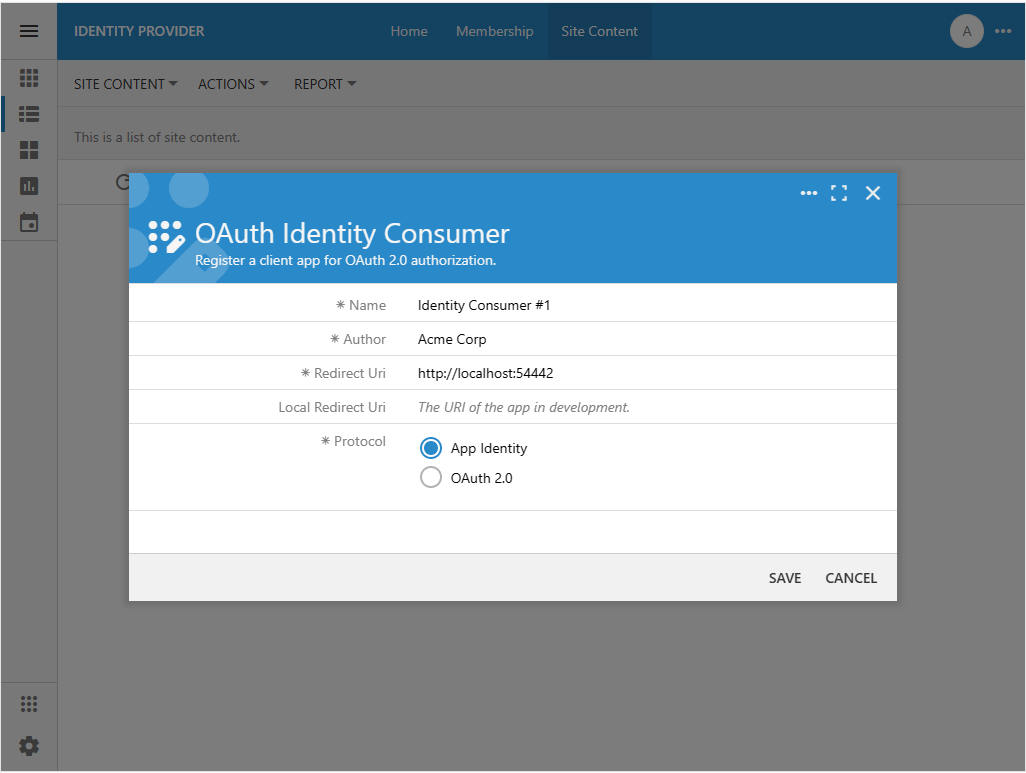
Complete the form as follows:
- Enter Identity Consumer #1 in the Name field.
- Enter Acme Corp in the Author field or specify the name of your organization.
- Paste the server address of the Identity Consumer #1 application in the Redirect Uri field. In this particular instance the address is set to http://localhost:54442. Note that the port number of your own identity consumer app instance will be different from the one in this tutorial.
- Leave the Local Redirect Uri blank.
- Set the Protocol to App Identity.
The App Identity protocol is the shortcut that will enable the OAuth 2.0 authorization flow between two server applications (consumer and provider). It will also treat the client as a trusted application, which will eliminate the approval of the authorized scopes when username and password are confirmed. Specify the App Identity protocol for the application modules created with Code On Time that are using the same identity provider to perform the single sign-on for the users in your organization. Specify the OAuth 2.0 protocol and desired authorization without trust if the client app was created outside of your organization.
The client app registration requires the Name, Author, Redirect Uri, and App Identity protocol for application modules created with Code On Time to be used by the same organization. The App Identity protocol will enable the server-to-server OAuth 2.0 authorization flow with trust. Authenticated users will not be asked to approve the authorization scopes requested by the modules.
Press the Save button to register the identity consumer application. The Name, Author, Redirect Uri, and Protocol fields will become read-only. The fields Client Id and Client Secret will appear in the form above the Protocol. Their values were generated automatically. Do not make the Client Secret public. This information must be available to administrators of the Identity Consumer #1 application only.
The client app will identify itself with the Client Id specified in the Authorization URL that starts the authorization flow sequence. The value of the Client Secret is specified in the private communications between the identity consumer and provider when the user information is retrieved.
The Client Id and Client Secret field values are assigned to the client app registration record automatically. Their values must be communicated to the administrator of the identity consumer application. The value of the Client Id will be passed explicitly in the Authorization URL constructed by the client app. The value of the Client Secret is passed between the identity consumer and provider privately when the user identity information is exchanged.
Keep the OAuthIdentity Consumer form open. Both the Client Id and Client Secret are needed to configure the provider of identity in the Identity Consumer #1 application.
Completing Identity Provider Configuration
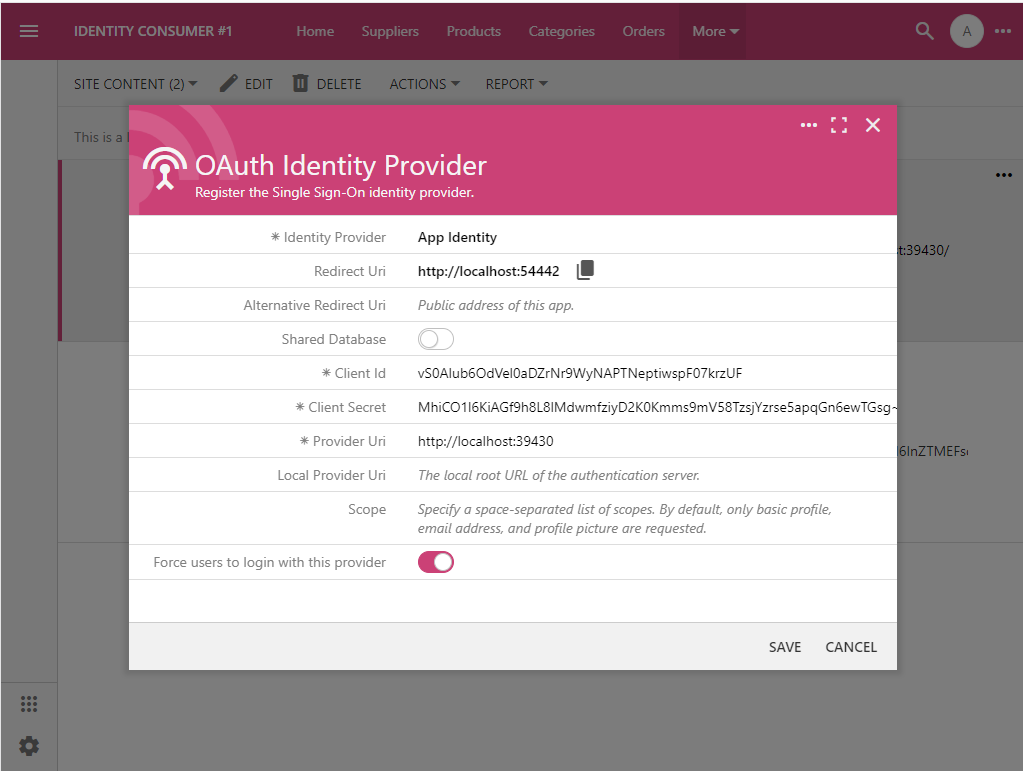
Configure the remaining fields of the OAuth Identity Provider in the Identity Consumer #1 application as follows:
- Keep the Shared Database toggle in the Off state.
- Switch to the browser window with the Identity Provider application and press the Copy icon next to the Client Id field in the OAuth Identity Consumer form. Return to the window with the Identity Consumer #1 application and paste the clipboard value into the Client Id field.
- Repeat the previous step to copy and paste the values of the Client Secret and Provider Uri fields.
- Leave the remaining fields blank and press the Save button.
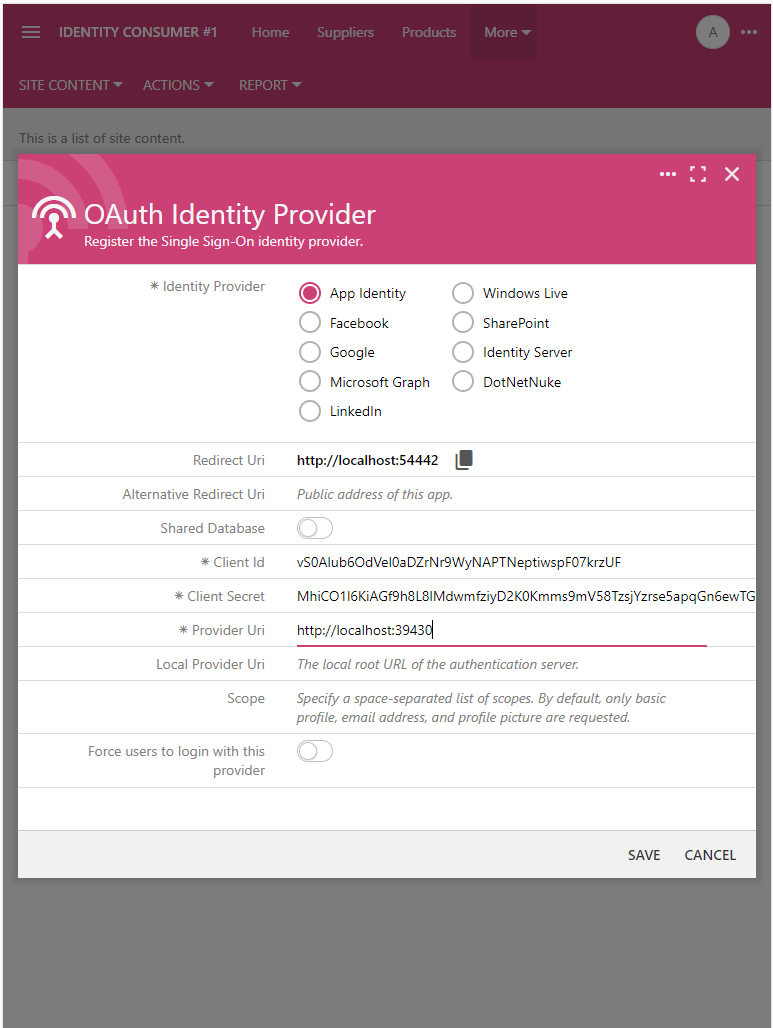
The OAuth Identity Provider form requires the Client Id and Client Secret known to the identity provider. It also requires a valid URL in the Provider Uri field. The Redirect Uri field is read-only. Its value is calculated by the consumer app at runtime. This value was specified in the identity consumer registration record stored in the content management system of the identity provider. The provider application will redirect to this URL with the authorization_code parameter when users grant access to their account.
The Federated Identity Management system running on the localhost address of your workstation is now ready to authenticate users on behalf of another app.
Now the users of the Identity Consumer #1 application can sign in with an identity managed in the Identity Provider application.
Sign-In With Identity Provider
Let’s try the bespoke Federated Identity Management system in action.
Identity Provider Account
The standard Login form of the Identity Consumer #1 application looks different. The new Account field offers the choice of the Identity Provider and Identity Consumer #1. Selecting the first option and pressing the Login button will begin the authentication process with the Identity Provider application. The second option will reveal the User Name and Password fields. Pressing the Login button will force the Identity Consumer #1 to verify the entered credentials against the existing users in its own database.
Note that the “provider” option in the Account field is named after the display name of the application that will be verifying the user identity.
Select the Identity Provider option in the Account field and press the Login button.
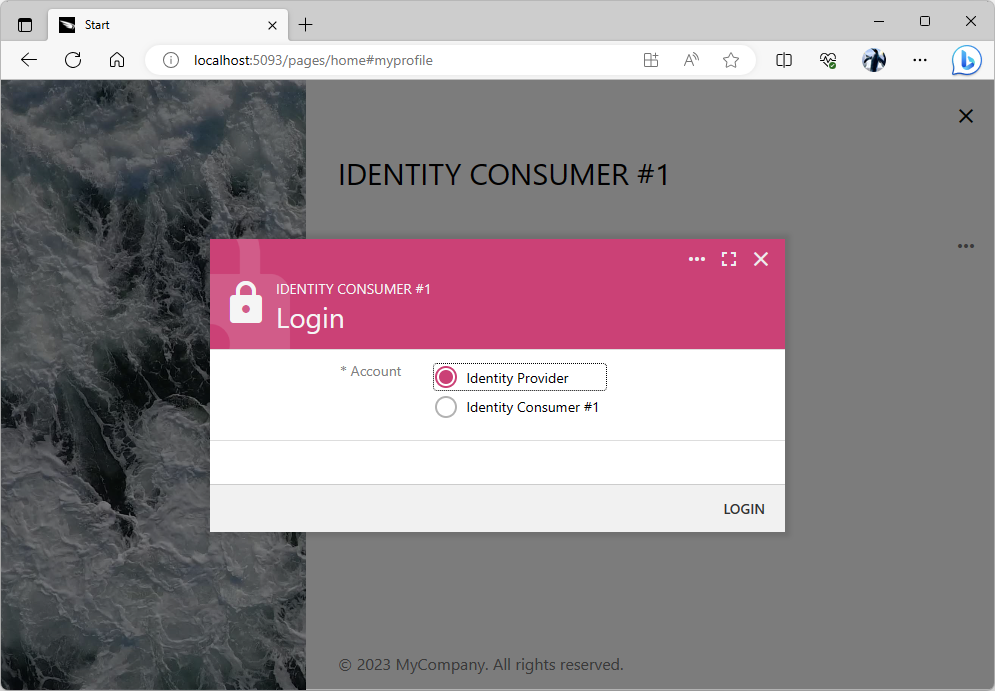
The standard Login form lists the names of the registered providers of identity and the name of the app itself in the Account field. The “provider” option will transfer the user to the corresponding identity provider application. Users will return back after confirming their identity with the provider. The last option in the Account field allows the user to sign in with their “local” username and password.
You will be redirected to the Identity Provider application and greeted with its Login form. Enter the credentials of the standard user account (the default username and password combination is user / user123%). Press the Login button.
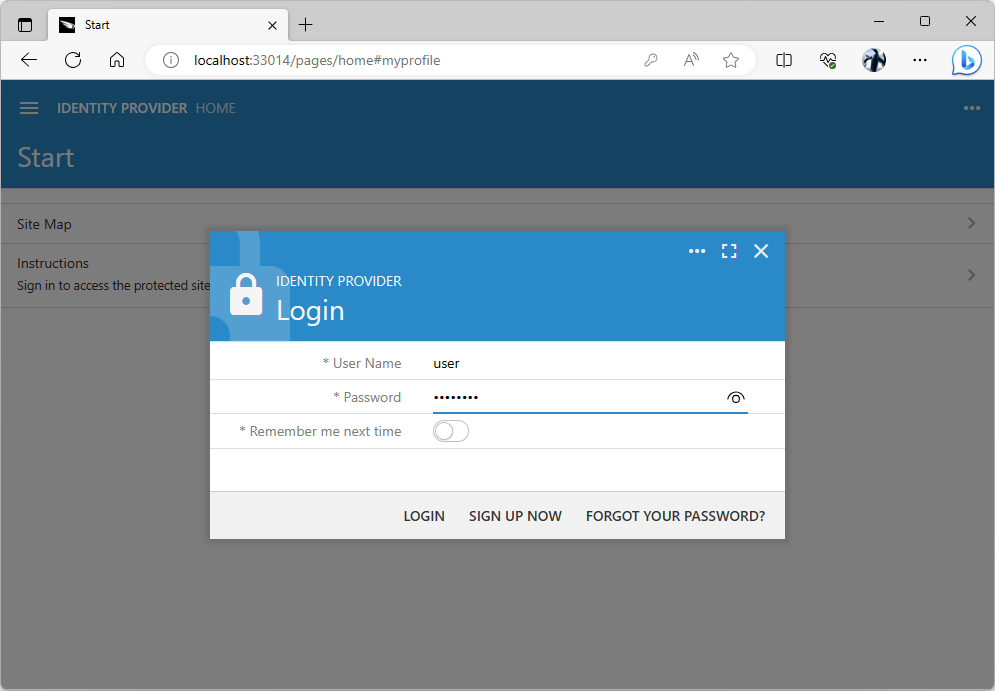
The Login form will greet the anonymous users redirected to the identity provider application after the authorization flow sequence has been started in the client app known to the provider.
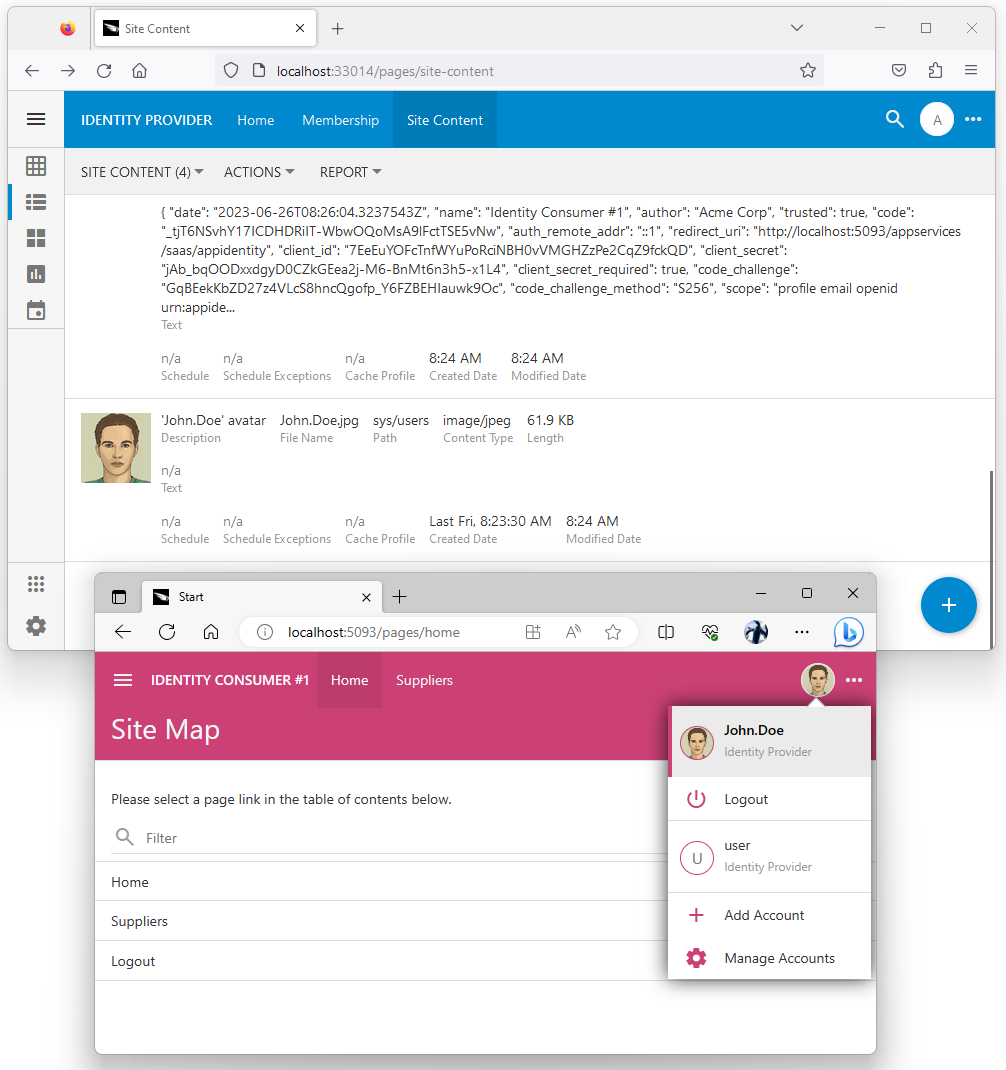
You will be transferred back to the client application that has initiated the authorization flow sequence if your identity was confirmed. The name and the source of the user identity is visible in the user context menu.
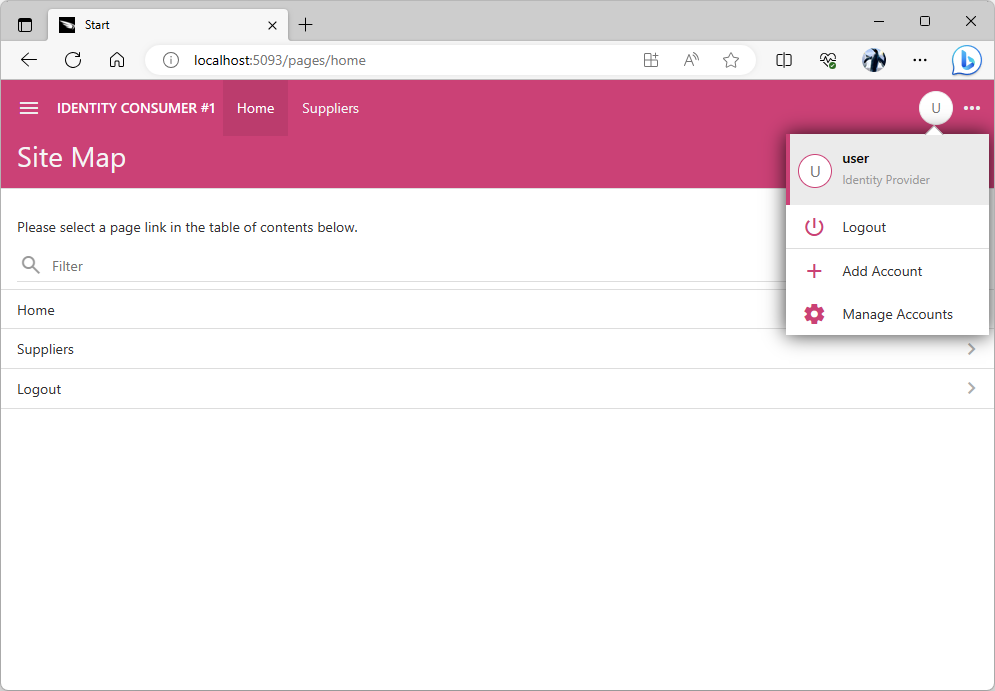
The user context menu shows the name of the provider that has confirmed the user identity. If the user has signed in with the “local” account, then their email address is displayed instead.
The Identity Provider application has redirected to the http://localhost:5093/appservices/saas/appidentity URL with the authorization_code parameter added to it after the successful validation of user credentials. The server-side code of the Identity Consumer #1 application exchanges the authorization_code parameter value for the access_token, refresh_token, and id_token. This information is persisted in the content management system. The user is automatically signed in.
The decoded id_token value contains the appidentity claim that includes the username, email, roles, and picture. This information is synchronized with the “shadow” user in the database of the Identity Consumer #1. This application uses the refresh_token to silently fetch the new id_token from the provider when the user revisits the application.
JSON
1234567891011121314151617181920212223242526272829303132{
  "iss": "http://localhost:56334/oauth2/v2",
  "azp": "7EeEuYOFcTnfWYuPoRciNBH0vVMGHZzPe2CqZ9fckQD",
  "aud": "http://localhost:65396",
  "sub": "fc905f09-5738-44c1-b7c1-82d3bf71b773",
  "iat": 1688283338,
  "exp": 1688284238,
  "email": "user@MyCompany.com",
  "email_verified": true,
  "name": null,
  "given_name": null,
  "family_name": null,
  "middle_name": null,
  "nickname": null,
  "preferred_username": null,
  "profile": null,
  "picture": null,
  "gender": null,
  "birthdate": null,
  "zoneinfo": "America/Los_Angeles",
  "locale": "en-US",
  "updated_at": null,
  "appidentity": {
    "username": "user",
    "email": "user@MyCompany.com",
    "roles": [
      "Users"
    ],
    "picture": null
  },
  "scope": "profile email openid urn:appidentity:user"
}
The user will not be asked to sign to the Identity Consumer #1 until they explicitly log out or when the refresh_token expires. The refresh_token will expire in seven days by default. Administrators of the Identity Provider application can lock the user account or change the user roles, email, and picture. The client application created with Code On Time will detect the change within fifteen minutes when users navigate to any page.
New Users
Applications built with Code On Time will create two sample user accounts in the membership system when an app instance starts. So far we have used both of them when signing in as admin and user to the Identity Consumer #1 and Identity Provider applications. Let’s create a new account in Identity Provider database and use it to sign into the Identity Consumer #1.
Navigate to the Identity Provider application and sign with the admin account if prompted. Select the Membership option in the menu and press the New User button above the list of users. Complete the New User form as follows:
- Enter John.Doe in the User Name field.
- Enter user123% in the Password field.
- Enter user123% in the Confirm Password field.
- Select the Users role in the Roles menu.
- Enter an email address in the Email field.
- Enter Hello in the Password Question field.
- Enter World in the Password Answer field.
Press the Save button to create the John.Doe user account.
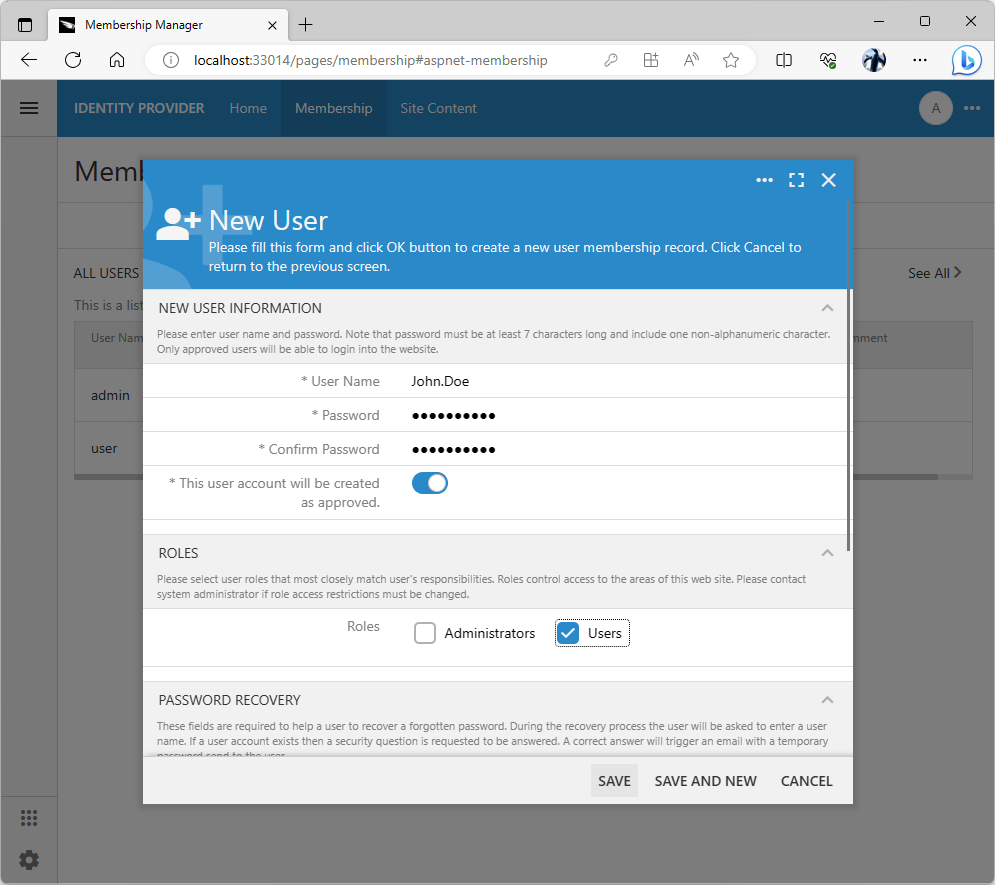
The built-in membership manager provides the forms that allow creating users and roles. The manager works with the standard database tables installed by the app builder when users configure the database connection string for the project. Developers can create custom membership management system based on their own database tables.
Navigate back to the Identity Consumer #1 application and choose the Add Account option in the user context menu if you are already signed-in. If you are not authenticated yet, then press the Login button instead.
Choose the Identity Provider option in the Account field of the Login form. Proceed to login and enter John.Doe / user123% credentials when prompted by the Identity Provider application. The successful validation of user identity will return the browser window back to the Identity Consumer #1 application. The John.Doe user will be signed-in automatically.
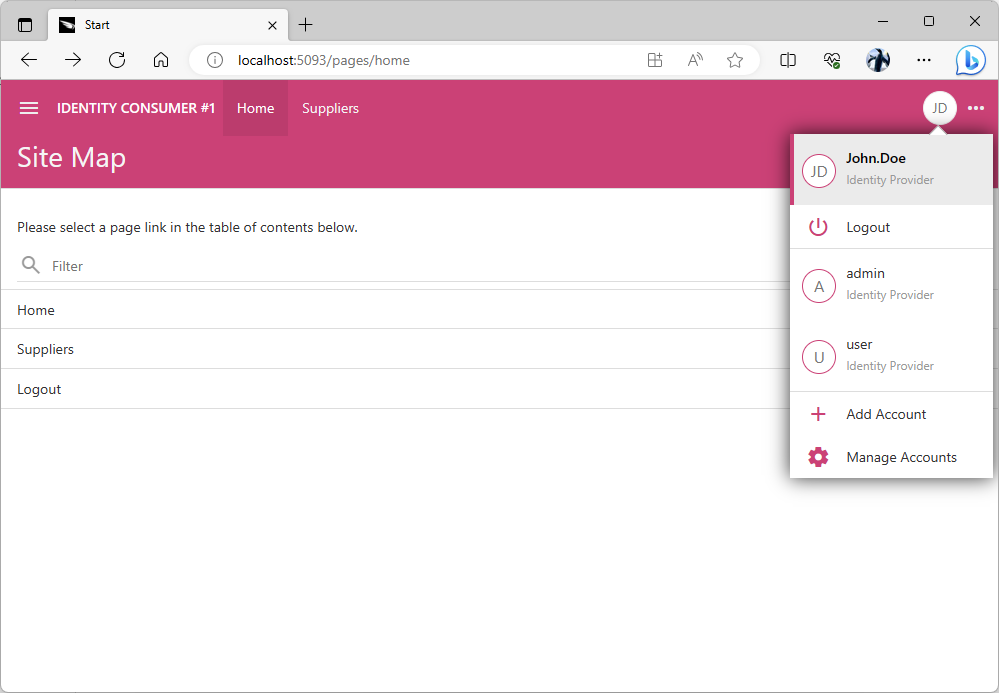
The new users that have not existed in the database of the identity consumer application database will have their information copied from the identity provider. The password of the new user will be set to a randomly generated global unique identifier in the consumer database. It is not possible to sign into the consumer application without the identity provider.
The identity consumer application creates the new “shadow” user account in its own database when a user without an existing account record is signed in by the identity provider.
The user password is a randomly generated unique identifier. The user roles are automatically created and assigned to match the user roles specified in the appidentity claim. The user picture is fetched from the URL specified in the same claim and saved in the content management system.
It is not possible to sign into the Identity Consumer #1 application with the “shadow” account since the password is not known. Only its hash value is stored in the application database. You will need to go through the Identity Provider application to sign in with the John.Doe account.
You can sign in as the admin user though since we do know the account password. The user password is not changed if the user account record exists at the moment when the user identity is being synchronized with the identity provider information specified in the appidentity claim. Sign in as admin / admin123% and navigate to the Membership page to review the John.Doe user account setup.
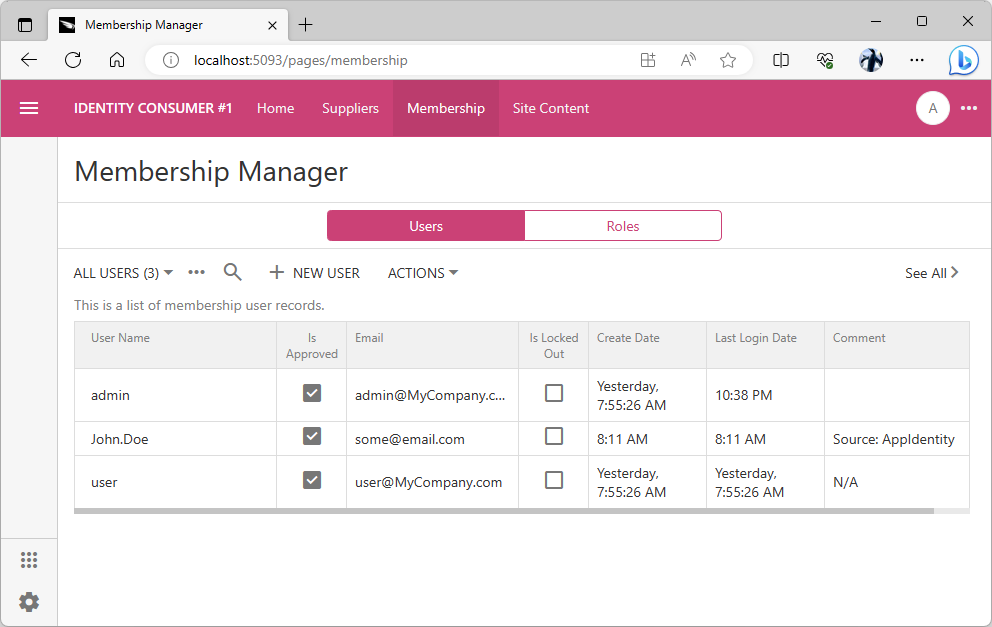
TBD - enumerate the available parameters.
Note the Source:AppIdentity value in the Comment field of the John.Doe user account.
User Pictures
A picture can be assigned to the user account in the content management system. Follow the instructions to upload a picture for John.Doe to the Site Content in the Identity Provider application.
Navigate to the Identity Consumer #1 app and log out. Sign in as John.Doe through the Identity Provider application. The uploaded picture will appear as the user avatar in the application user interface.
User pictures uploaded to the Site Content in the identity provider database are available as URLs when consumers obtain the user identity information. An identity consumer application created with Code On Time will fetch the image and persist it in its own CMS when the user information is synced.
Forcing Login With Provider
The OAuth Identity Provider form has the option that forces users to login with the specified provider. Sign in with the admin account in the Identity Consumer #1 application, navigate to the Site Content and search for appidentity phrase. Select the provider registration record and indicate that you want to have it as the sole login option. Save the form.
The identity provider registration can make it mandatory to sign in with the provider. The Login prompt will not be displayed to users in the “identity consumer” apps. Anonymous users will be sent to confirm their identity to the “identity provider” application automatically.
Log out and you will be redirected to the identity provider immediately. The Identity Provider application will offer a choice of previously used login credentials to sign into the Identity Consumer #1.
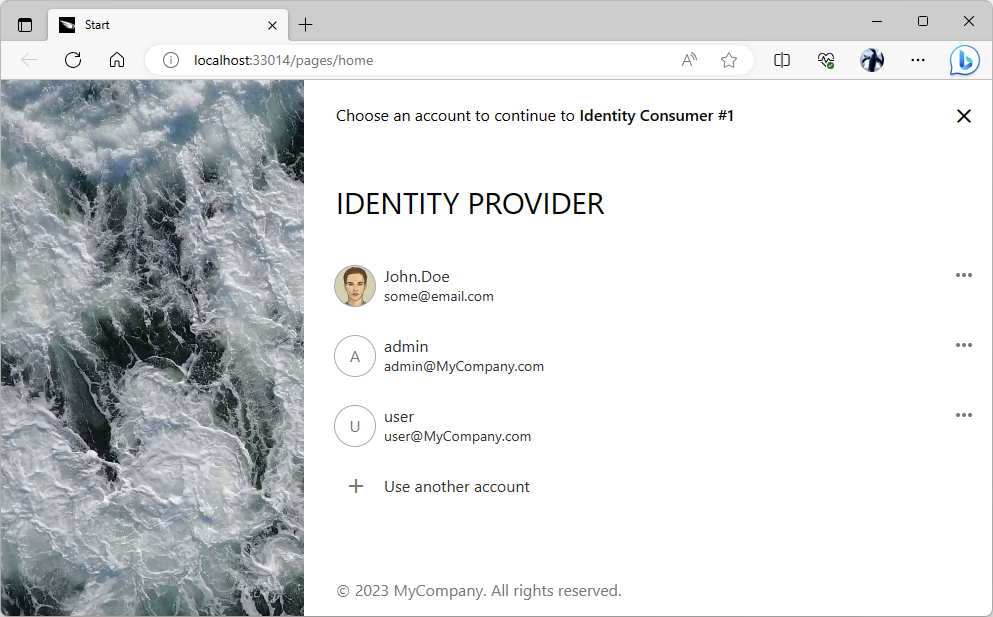
The sign-in user experience of the “identity provider” application becomes the only way to access the protected content in an “identity consumer” app when the provider is forced as the sole login option.
Forcing users to login with an identity provider is eliminating the Login prompt in the Identity Consumer #1 application. This streamlines the sign-in experience.
If an application does have a “local” user account with a known password, then navigate to the app with _autoLogin=false parameter specified in the address. This will override the automatic redirect to the identity provider and give the option to sign in with the “local” account. For example, the http://localhost:5093/pages/home?_autoLogin=false URL will display the login prompt in the Identity Consumer #1 application even when the users are forced to sign in with the identity provider.
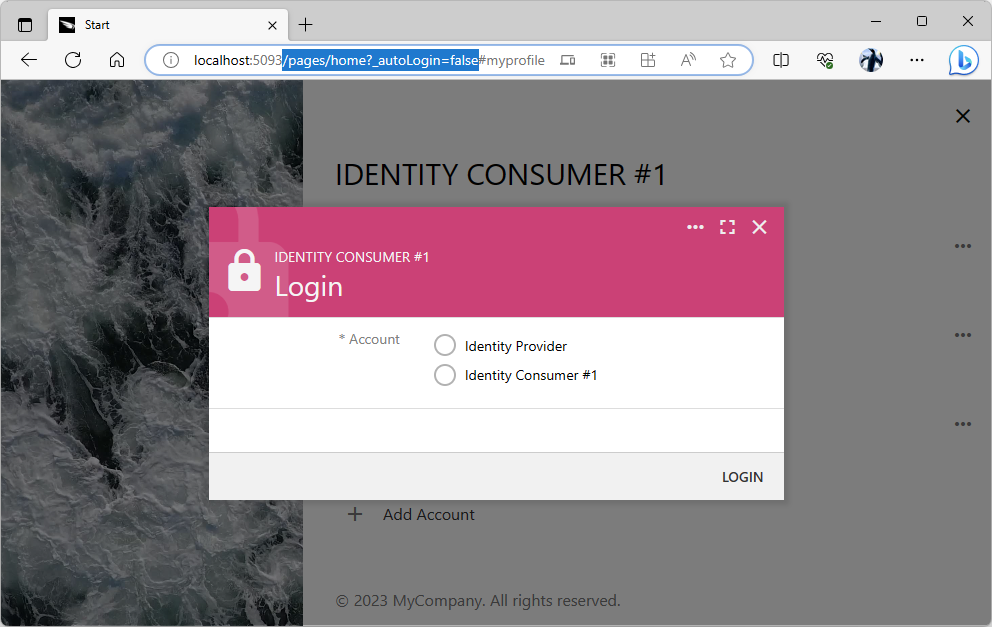
The _autoLogin=false parameter will override the automatic login redirect to the “identity provider” application when specified in the URL on an “identity consumer” app.
It is not recommended to have the “local” user accounts with the known passwords in the identity consumer applications when the Federated Identity Management is running in production mode. All user accounts must be managed by the Identity Provider.
Provider Uri and Debugging
Naturally a certain amount of debugging may be required when putting together your own Federated Identity Management system. Running an application created with Code On Time from Visual Studio will launch the app on the port that is dynamically assigned by the debugger. This is not the same port used to start an application from the app builder on the localhost address.
It will not be possible for the identity consumer to sign with the identity provider application in debug mode unless the Local Redirect Uri and Local Provider Uri are specified in the Identity Consumer and Identity Provider records. The former is the URL of the Identity Consumer #1 application launched in debug mode from Visual Studio. The latter is the URL of the Identity Provider application launched in debug mode from Visual Studio.
Provider Uri and Deployment
An identity provider application can be prototyped quickly to implement the basic single sign-on for the other modules. Deploy the provider to a production server and start managing the user accounts there. The Identity Provider records of the modules built with Code On Time must be updated to reference the production environment. Make sure to clear the Local Provider Uri to sign in with the production user directory in debug mode.
Consuming Identity in Any App
An application module may offer a public content to the anonymous users. If the module is built with Code On Time, then it is easy to construct a URL that will start the authorization process for a user. Specify the “Login” link or button in the public pages and make it navigate to the /appservices/saas/appidentity path relative to the module root. The module will locate the App Identity provider information in its content management system and begin the authorization flow sequence automatically.
An application module can be built with any tools or technology and authenticate its users with the “identity provider” application created with Code On Time. This included the web applications running in a browser, native apps running on mobile devices, and embedded software running on the specialized hardware.
Native Apps
An application created for a particular mobile operating system is a native app. Such applications are frequently distributed through app stores. It is not possible to incorporate a client secret in such applications since their source code can be decompiled and viewed by third-parties. Use the OAuth 2.0 Authorization Flow with PKCE to authenticate users with an identity provider that was created with Code On Time.
Web Applications
An application running in a browser typically has the server code that can perform the server-to-sever communications. This makes such apps capable of keeping a secret. Register web applications for server-to-server authorization and use the OAuth 2.0 Authorization Flow with PKCE enhanced with the Client Secret.
Devices
Applications running on the devices with the limited input capabilities can authenticate their users with the Device Authorization Flow. The hardware may display a code obtained from an identity provider created with Code On Time. Users will navigate to the identity provider on their mobile device and enter the code to authorize access to their account. The embedded software will use the access token to act on behalf of the user.
External Identity Providers
The identity provider application can register its own external identity providers such as Google or Microsoft Graph. The registered external providers will appear in the Login form of the provider application. The “identity provider” application will need to be registered as a client of the supported external identity provider. It will perform the server-to-server communication to confirm the user identity.
Other application modules will be able to take advantage of the authorization with the external providers through their “identity provider” created with Code On Time.
User Identity Claims
An “identity consumer” application gets the id_token of the authenticated user after exchanging the authorizaton_code for an access_token if the openid scope is specified in the authorization request. The number of claims in the id_token depends on the other authorized scopes.
For example, the App Identity provider configured in the Identity Consumer #1 is specifying the urn:appidentity:user scope when requesting the authorization from the Identity Provider application. This scope is specific to applications created with Code On Time. The provider includes the appidentity claim in the id_token. The claim contains the username, email, roles, and picture of the user account.
JSON
1234567891011121314151617181920212223242526272829303132{
  "iss": "http://localhost:33014/oauth2/v2",
  "azp": "7EeEuYOFcTnfWYuPoRciNBH0vVMGHZzPe2CqZ9fckQD",
  "aud": "http://localhost:65396",
  "sub": "dac6229a-29d4-4c34-92f7-5dda7396b480",
  "iat": 1687764791,
  "exp": 1687765691,
  "email": "some@email.com",
  "email_verified": true,
  "name": null,
  "given_name": null,
  "family_name": null,
  "middle_name": null,
  "nickname": null,
  "preferred_username": null,
  "profile": null,
  "picture": "http://localhost:33014/oauth2/v2/userinfo/pictures/original/c-FGt6yulUBiwO6Khk4UJ7ZGgbMSHwuCSFMPkfJXyZk.jpeg",
  "gender": null,
  "birthdate": null,
  "zoneinfo": "America/Los_Angeles",
  "locale": "en-US",
  "updated_at": null,
  "appidentity": {
    "username": "John.Doe",
    "email": "some@email.com",
    "roles": [
      "Users"
    ],
    "picture": "http://localhost:33014/oauth2/v2/userinfo/pictures/original/c-FGt6yulUBiwO6Khk4UJ7ZGgbMSHwuCSFMPkfJXyZk.jpeg"
  },
  "scope": "profile email openid urn:appidentity:user"
}
The custom “identity provider” implementation can customize the id_token with its own custom claims and specify the values of the standard claims such as gender or birthdate. The custom claims can be included for specific applications or when the custom scopes are specified in the context.
This is the sample code that assigns the given_name and family_name, and gender claims if the username is John.Doe. It also specifies the appidentity.message if the client application name is Identity Consumer#1. Place this code in the ~/App_Code/custom/RESTfulResource.Overrides.cs file in the Identity Provider project. The real-world implementation will lookup the database to populate the claims specific to the user, scopes, and application. The authorized scopes are available in the scope key of the claims variable and context argument.
C#
1234567891011121314151617181920212223242526using System;
using System.Web.Security;
using Newtonsoft.Json.Linq;

namespace MyCompany.Services.Rest
{
    public partial class RESTfulResource
    {
        public override JObject EnumerateIdClaims(string grantType, MembershipUser user, JObject context)
        {
            var claims = base.EnumerateIdClaims(grantType, user, context);
            if (user.UserName == "John.Doe")
            {
                claims["given_name"] = "John";
                claims["family_name"] = "Doe";
                claims["gender"] = "male";
                if (Convert.ToString(context["name"]) == "Identity Consumer #1")
                {
                    claims["appidentity"]["message"] = "Hello World!";
                }
            }
            return claims;
        }

    }
}
Create the ~/App_Code/custom/AppIdentityOAuthHandler.Overrides.cs file in the Identity Consumer #1 project and enter the following code. It provides the foundation for a custom user synchronization. The claims specified in the userInfo variable can be parsed and stored in the application database.
C#
1234567891011121314151617using System.Web.Security;

using System.Web.Security;

namespace MyCompany.Services
{
    public partial class AppIdentityOAuthHandler
    {
        public override MembershipUser SyncUser()
        {
            var user = base.SyncUser();
            var userInfo = Claims;
            // TODO: process the user info here
            return user;
        }
    }
}
Shared Database
An “identity consumer” application can share the database with the “identity provider”. Make sure to specify this fact when configuring the App Identity provider of a consumer module. The framework will not perform the user synchronization since the entire set of properties of the authenticated user is readily available.
Sharing of the database eliminates the need to write the synchronization code but makes independent database backup and performance tuning impossible for the modules and the identity provider.