Multi-factor authentication
A combination of a username and password provides access to the personalized features of applications. Unfortunately both elements of the online identity are the primary source of the security breaches. Username and password are obtained by perpetrators through social engineering attacks, spy programs, and other nefarious means. The complexity of our lives forces us to share the passwords with loved ones and friends. The robust mechanisms of online identity protection are urgently needed in every application.
Many organizations adopt security systems that require the end users to enter a numeric time-based verification code generated by an authenticator app installed on the user’s mobile device. The unique secret key is associated with the user account in the application database. Authenticator app uses the same secret to generate a new verification code periodically and does not require a network interaction with the application. If the correct verification code is not provided at the time of sign in, then the access to the application is not granted even if the user is entering the correct username and password combination.
The username, the password, the text message or email with the verification code, the phone with the authenticator app with optional fingerprint scan or face recognition are the components of the multi-factor authentication.
2-Factor Authentication Setup
Applications created with Code On Time can force the end users to provide an additional piece of information to confirm their identity after the username and password were confirmed. By default, the 2-Factor Authentication is the opt-in feature. It can be enabled in the user context menu.
The option “2-Factor Authentication” is available to the authenticated user. The 2FA setup is not available to the end user if the user identity is confirmed by an OAuth provider. Application will rely on the authentication verification methods of the provider instead. The initial activation of 2FA will require the user to confirm their password.
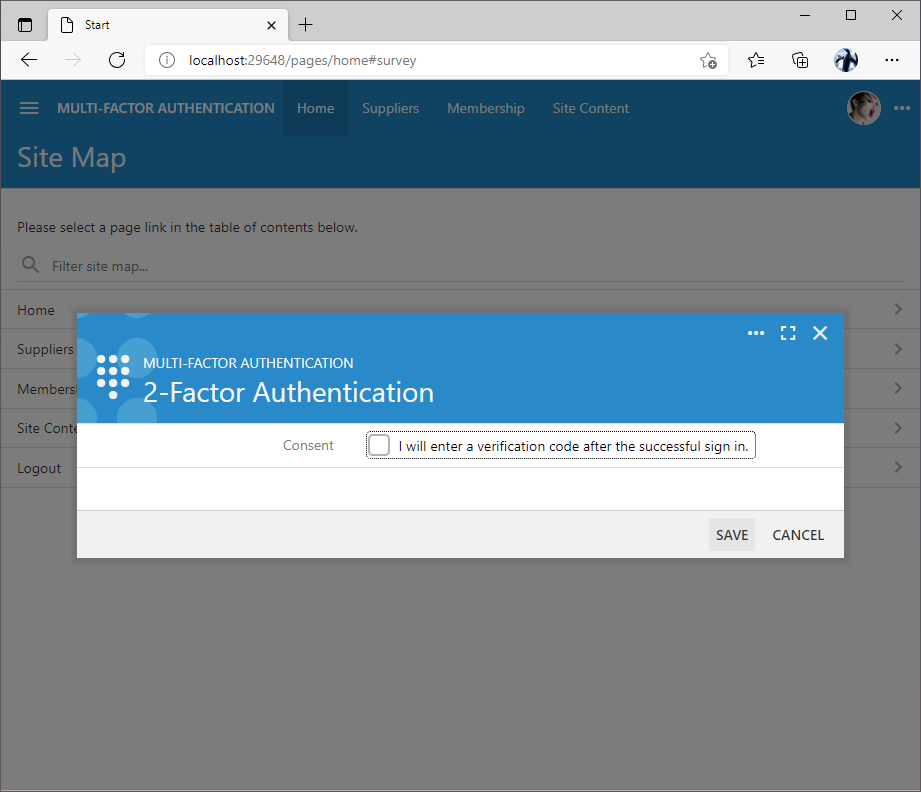
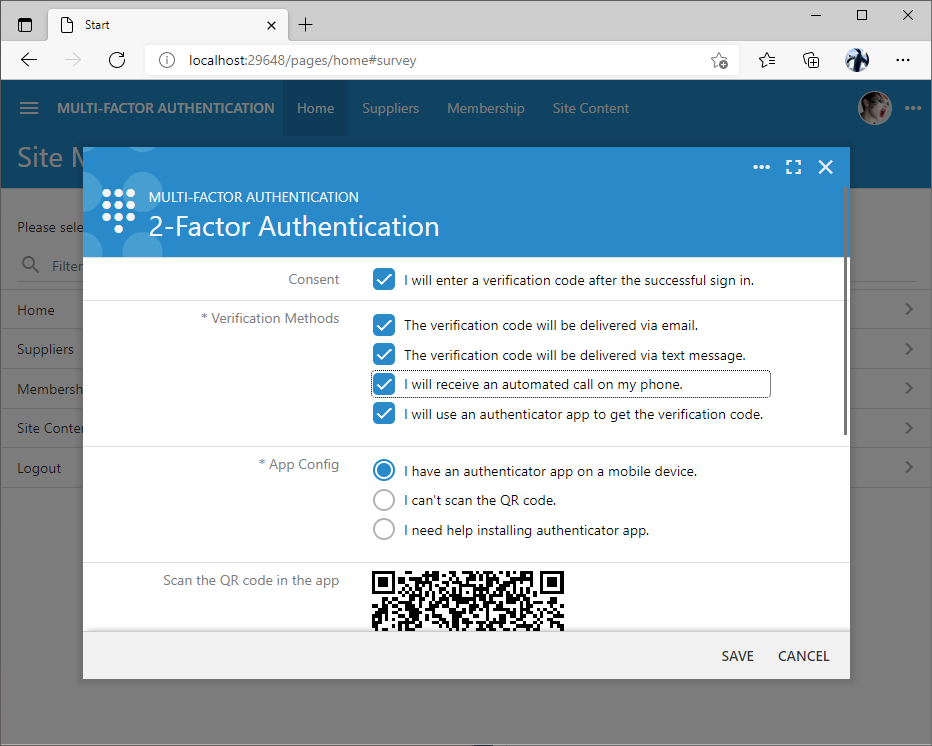
Next the user is giving a consent to enter a verification code after the successful sign in. By default two verification methods are offered. Users may opt into getting a verification code via email and to use an authenticator app.
The verification code delivery via email will rely on the email address associated with the user account. This is a less secure method than using an authenticator app since there may be other individuals who can read the user’s emails.
Choosing the more secure method of verification will present the user with the QR code that needs to be scanned in Google Authenticator, Microsoft Authenticator, or another similar app. The QR code includes the information about the secret associated with the user account, the name of the app, and the name of the user along with some additional configuration data.
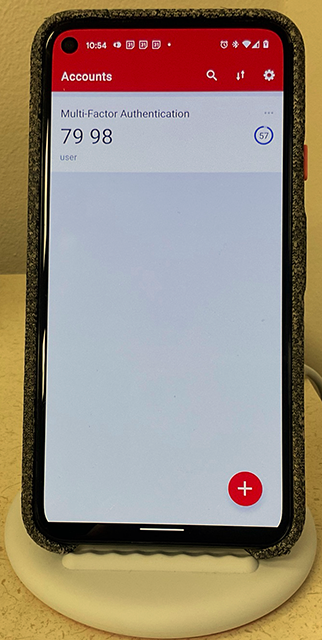
Google Authenticator immediately begins showing the verification code after the scan of the QR code. The time code will change every 30 seconds. There is no need to write down the verification codes since they will not be usable in the future. Other authenticator apps have a similar user interface and may require fingerprint scan or face recognition to display the verification codes.
If the user is not able to scan the QR code then they may opt to enter the setup key manually directly in the authenticator app.
Users may also indicate that they need help installing an authenticator app. Three apps are offered by default. Scanning of the QR code with the camera of the mobile device will direct the user to the corresponding app store.
Users must press the Next button when their authenticator app is configured through the QR code scan or after the direct input of the setup key.
The configuration screen will present the list of the one-time use backup codes The backup codes are also available for the other verification methods including email, text message, and call.
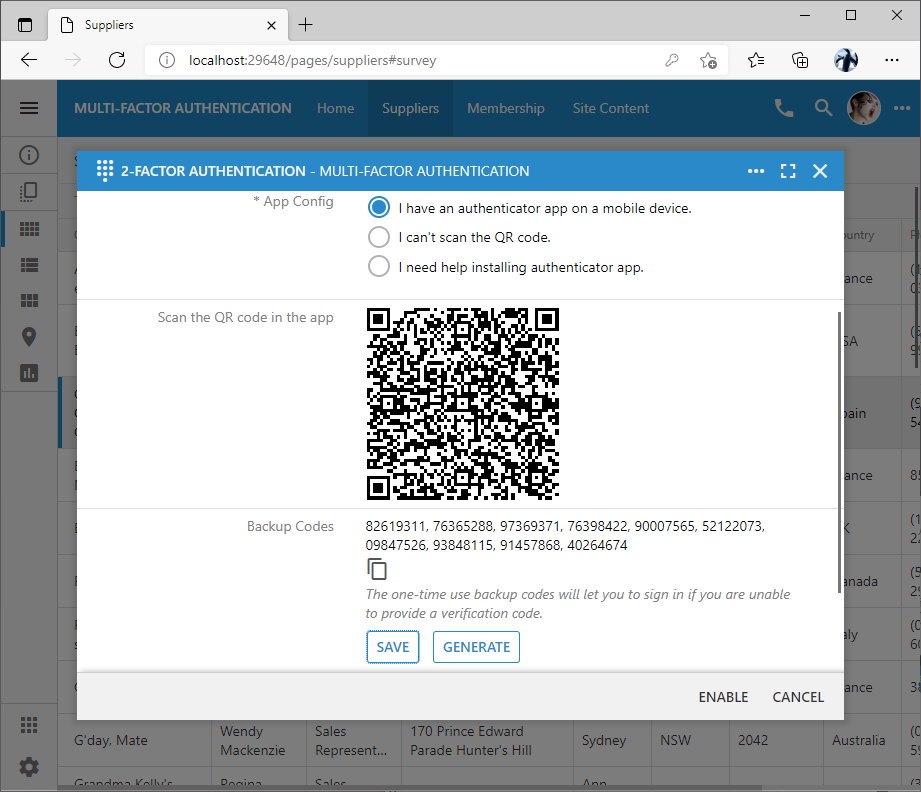
The backup codes are stored directly in the user account. Each backup code can be used one time only as an alternative to the verification code in the situations when the mobile device with the authenticator app is not available and there are no other means of getting a verification code. Button Save will create a file with the current set of backup codes. Button Generate will produce a new set of backup codes. It is recommended to print the backup codes and have them stored in the safe place.
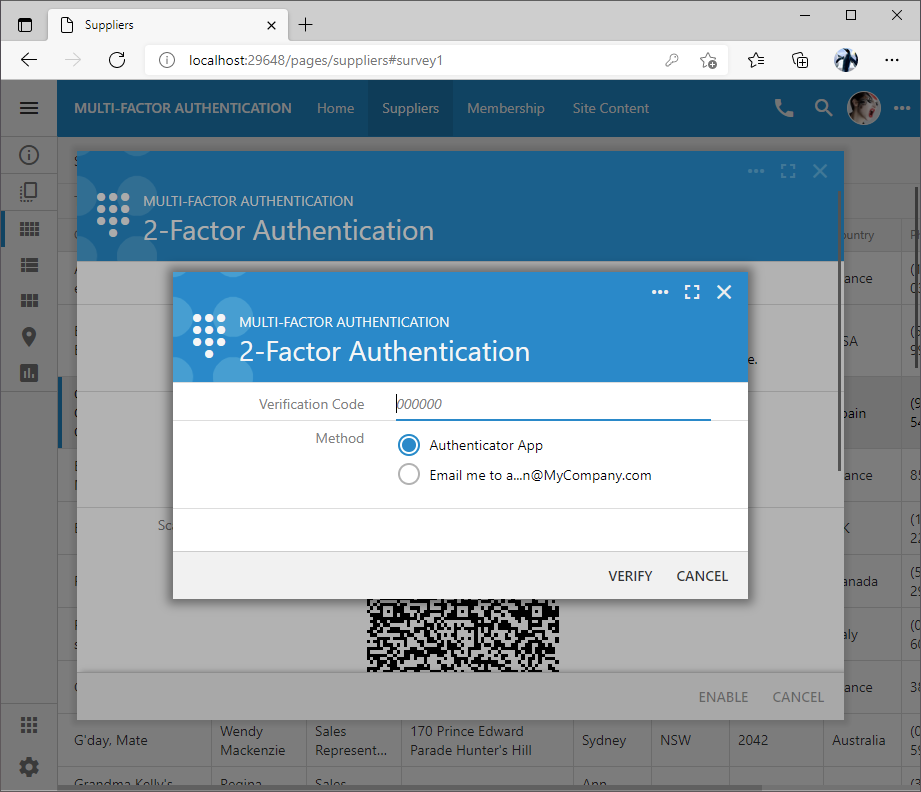
Users complete the configuration by pressing the Enable button. This will result in the request to enter a verification code. Type in the verification code displayed in the authenticator app or get the code via email. Successful input of the verification code will enable the 2-factor authentication for the user account. The backup codes are not accepted during the setup verification. The objective of the setup verification is to ensure that the user is able to get the verification codes with the selected methods of delivery
Living With 2-Factor Authentication
The application will still require the user to enter the username and password in the custom or standard Login form.
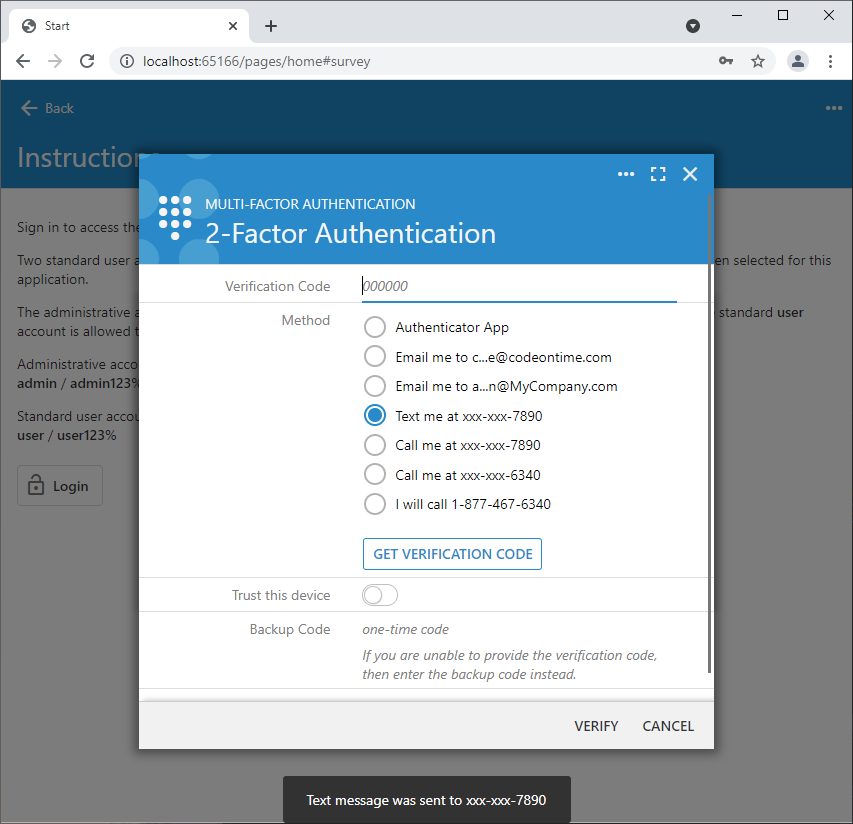
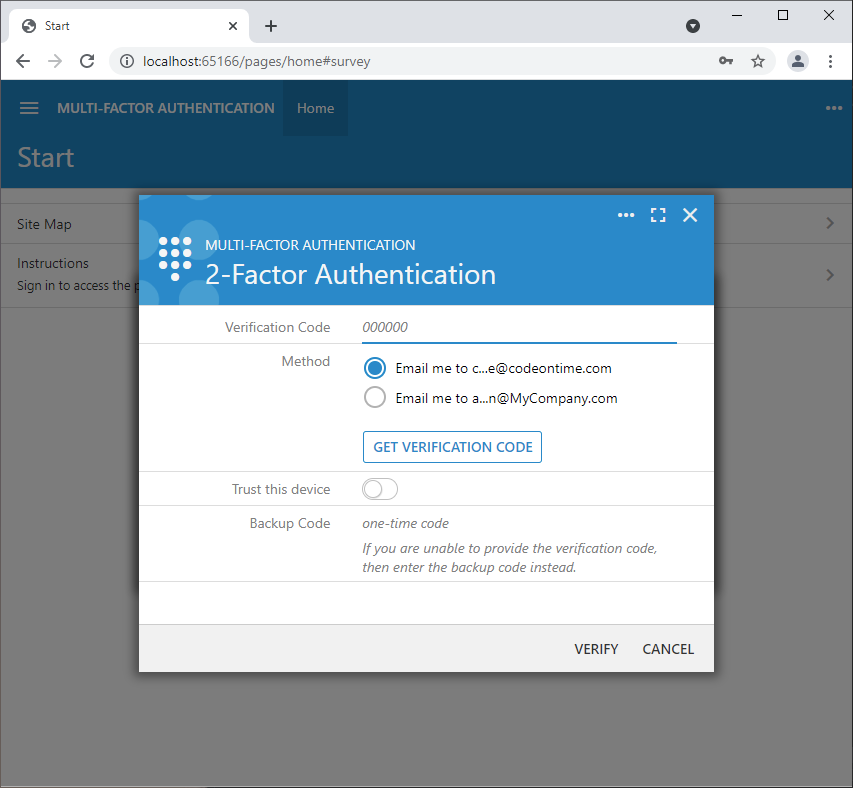
Successful identification of the user will present the request to input the verification code. The user may opt to enter a one-time use backup code as an alternative to the verification code. Input of the incorrect verification or backup code will count as a failed login attempt. Multiple failed attempts to verify the username and password will result in the locked user account.
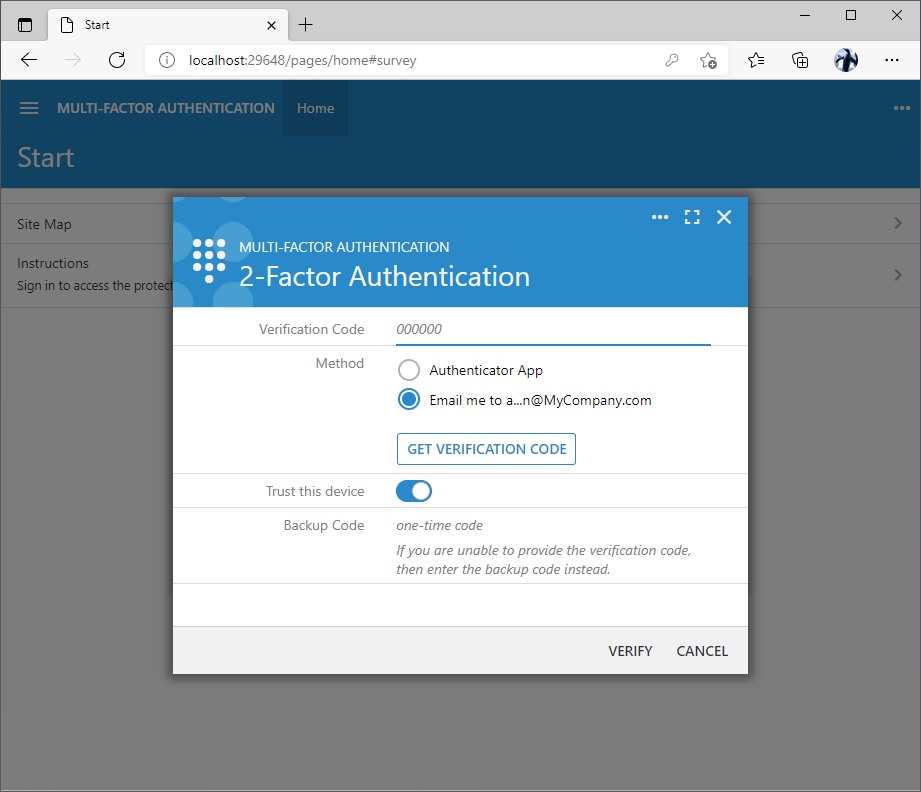
If the device can be trusted then the further requests to input the verification code can be suppressed by selecting the “Trust this device” option. The encrypted cookie with a unique verification code associated with the user name will be created. The application will verify the code stored in the cookie after the successful sign in to confirm the user identity.
Selection of the verification method may reveal the Get Verification Code button. The verification code is delivered when the button is pressed.
The setup screen can be re-entered by choosing the same “2-Factor Authentication” option in the user context menu. Users will be greeted with the verification code input screen before the setup options are presented. Users may change the verification code delivery methods, download the backup codes, or generate a new set of backup codes. Changes will be saved after another successful verification code input.
Disabling 2-Factor Authentication
Users may disable the 2-factor authentication by withdrawing the consent to enter a verification code. The withdrawal of the consent in the setup screen will disable the 2FA for the user account when the Save button is pressed.
The multi-factor authentication can be permanently disabled in the application by setting the server.2FA.enabled option to false in the ~/app/touch-settings.json configuration file.
Prerequisites
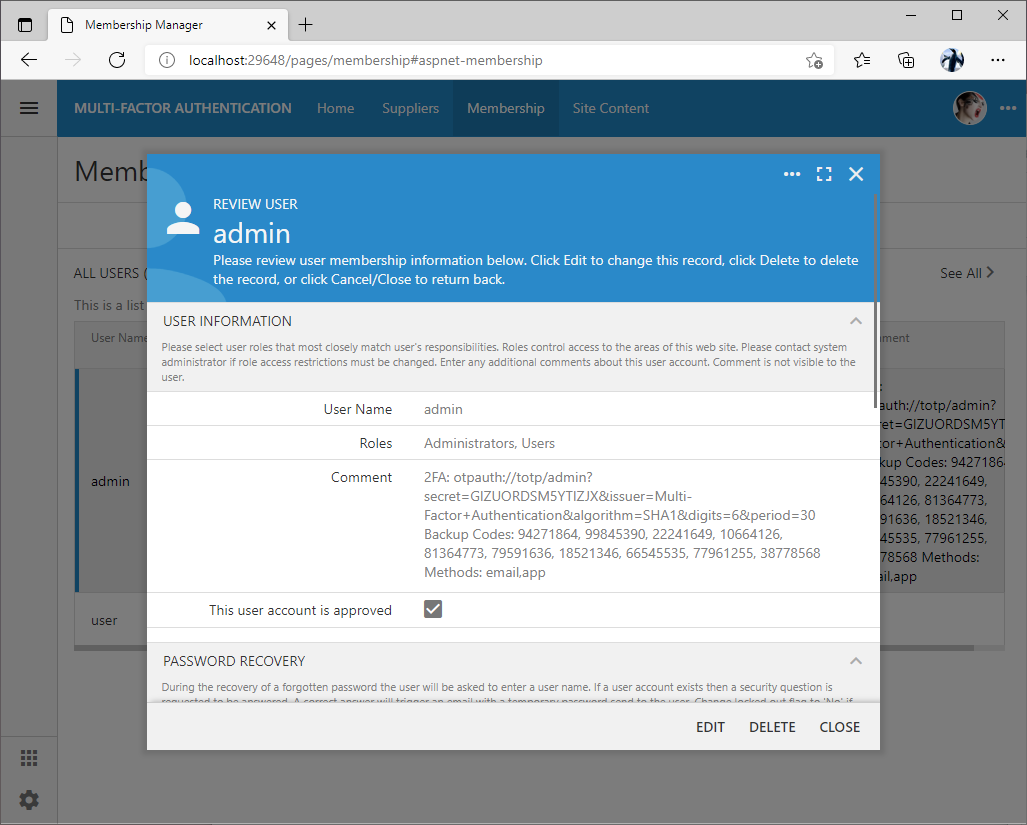
2FA requires the additional data to be stored in the user account in the application database. If you have enabled the standard membership feature in your Code On Time app, then there is no need to do anything else. The application will store the 2FA setup in the Comment field of the user membership account.
The screenshot below shows the Comment field of the admin user configured for multi-factor authentication.
If the custom membership manager is configured for the Code On Time application, then make sure to map the Comment logical field to the corresponding column in your own “Users” table.
The application framework provides two methods in the ApplicationServices class to read and write the user authentication data. Developers may override the methods ReadUserAuthenticationData and WriteUserAuthenticationData to store the data elsewhere.
Verification Code with SMS and Call
Developers may enable three additional methods of verification code delivery in the app. These include sms, call, and dial. Enter the following options in the touch-settings.json file of your application to enable these methods:
Re-enter the 2FA setup and enable the verification code delivery via text message and call. Save the setup.
Verification methods app and email are enabled by default and available on the 2FA setup screen. Delivery via email will require specifying the SMTP server parameters in Settings | Features | Smtp Configuration section of the project configuration.
There is no built-in support for sms or voice call delivery of the verification code in the framework. Developers may sign up for the text and voice delivery services from their favorite messaging provider and override two methods in the ApplicationServices partial class.
Method OtpVerificationData must provide the means of verification code delivery for the given username parameter. The implementation below uses the sample static values.
Method OptAuthenticationSendVerificationCode implements the physical delivery of the verification code. The implementation must send the contents of the message parameter to the contact using the code specific to the messaging provider.
Users will initiate the delivery by selecting the corresponding method and pressing the Get Verification Code button. The delivery confirmation message will be displayed at the bottom of the screen. The framework obfuscates the email addresses and phone numbers available in the list of methods.
The dial verification method entered in the server.2FA.verify.dial option in touch-settings.json file. It will provide the user with the phone number to call. Use this delivery method if the live operator will be available to the application users to assist with their identity verification. The operator may enter the one-time use backup code directly into the user account in the Membership Manager or in a custom form. This backup code may be a word or a number that the operator will communicate to the user after their identity is confirmed.
Trust No One
Developers may force the users to always enter the verification code when signing into the app.
Parameter server.2FA.trustThisDevice must be set to 0 in touch-settings.json to hide the “Trust this device” option on the verification code input screen.
The default value of the parameter is 180. It specifies the number of days during which the user will be able to avoid entering the verification code when signing into the application after the initial verification with the “Trust this device” option.
If the user has lost access to the “trusted” device then the 2-factor authentication must be disabled and enabled one more time on the user account to invalidate any previous trusts.
Verification Code Length and Period
The default length of the verification code is set to 6 digits that are changing every 30 seconds. Application framework will compare the provided verification code with the codes produced in the 180 second window.
The length of the verification code, the period of change, and the testing window can be changed like this:
The longer testing window can be specified if the delivery of the verification codes is slower than 3 minutes.
Parameter server.2FA.code.window is provided exclusively for the application. It will generate multiple verification codes in the specified time window to find the match to the verification code provided by the user.
Do not change the length and period if you expect the end users to work with the authenticator apps from Google or Microsoft. These apps will ignore the parameters and generate the 6 digit code every 30 seconds.
Salesforce Authenticator will respect the length and period parameters. It will correctly generate the 4-digit verification code every 60 seconds as instructed by the app.
Developers can specify their own set of the authenticator apps to be available on the setup screen. Option server.2FA.setup.authenticators is an array of name/url pairs in touch-settings.json. This custom set is presented to the user asking for help with the installation of the authenticator app. Users are prompted to scan the QR code with the device camera, which will present the link leading to the app store directly on the device.
Backup Codes
By default the 2FA setup will produce ten 8-digit backup codes. Developers may opt to configure their own set of backup codes.
This configuration will produce the set of five 3-digit backup codes.
Users must print or save the backup codes and use them if the access to the verification methods selected during the setup is lost.
Auto-Setup
By default the 2-factor authentication requires the users to opt in. Developers have an option to automatically generate the 2FA setup for the user accounts at the moment when the user is singing in.
For example, the following configuration in touch-settings.json will automatically create the 2FA setup with the email-based delivery of verification codes.
Users will enter the username and password and press login. The framework will create the 2FA setup if it does not exist. Users will be immediately presented with the request to enter the verification code. The only option to get the verification code is the email.
Make sure to set up the SMTP Configuration in the Settings | Features of the application. Otherwise users will not be able to access the application.
Applications may support the other methods of verification that can be configured in server.2FA.verify section of touch-settings.json as explained above. Users will need to enter the setup mode through the user context menu to change their verification preferences.
If a user withdraws the consent to enter the verification code, then the application will perform the automatic setup during the next sign in to keep the user accounts protected.
Login Without Password
Automatic setup makes it possible to disable the requirement to enter the password during the setup. Set the server.2FA.disableLoginPassword to true and server.2FA.setup.mode to auto in touch-settings.json. Optionally specify the automatic setup methods. The default setup method of verification code delivery is email.
The built-in login form will not ask the user to enter the password.
The framework will locate the user account by name. If the user is found, then the automatic 2FA setup is performed when needed. The user will be asked to enter a verification code to sign in.
The initial verification is done via email. Users may opt to enable the authenticator app verification in the setup. We recommend also setting the server.2FA.trustThisDevice option to 0 to ensure that the verification code is always requested.