Data Aquarium Framework

Labels
AJAX(112) App Studio(9) Apple(1) Application Builder(245) Application Factory(207) ASP.NET(95) ASP.NET 3.5(45) ASP.NET Code Generator(72) ASP.NET Membership(28) Azure(18) Barcode(2) Barcodes(3) BLOB(18) Business Rules(1) Business Rules/Logic(140) BYOD(13) Caching(2) Calendar(5) Charts(29) Cloud(14) Cloud On Time(2) Cloud On Time for Windows 7(2) Code Generator(54) Collaboration(11) command line(1) Conflict Detection(1) Content Management System(12) COT Tools for Excel(26) CRUD(1) Custom Actions(1) Data Aquarium Framework(122) Data Sheet(9) Data Sources(22) Database Lookups(50) Deployment(22) Designer(178) Device(1) DotNetNuke(12) EASE(20) Email(6) Features(101) Firebird(1) Form Builder(14) Globalization and Localization(6) How To(1) Hypermedia(2) Inline Editing(1) Installation(5) JavaScript(20) Kiosk(1) Low Code(3) Mac(1) Many-To-Many(4) Maps(6) Master/Detail(36) Microservices(4) Mobile(63) Mode Builder(3) Model Builder(3) MySQL(10) Native Apps(5) News(18) OAuth(9) OAuth Scopes(1) OAuth2(13) Offline(20) Offline Apps(4) Offline Sync(5) Oracle(11) PKCE(2) Postgre SQL(1) PostgreSQL(2) PWA(2) QR codes(2) Rapid Application Development(5) Reading Pane(2) Release Notes(184) Reports(48) REST(29) RESTful(29) RESTful Workshop(15) RFID tags(1) SaaS(7) Security(81) SharePoint(12) SPA(6) SQL Anywhere(3) SQL Server(26) SSO(1) Stored Procedure(4) Teamwork(15) Tips and Tricks(87) Tools for Excel(3) Touch UI(93) Transactions(5) Tutorials(183) Universal Windows Platform(3) User Interface(338) Video Tutorial(37) Web 2.0(100) Web App Generator(101) Web Application Generator(607) Web Form Builder(40) Web.Config(9) Workflow(28)
Archive
Blog
Data Aquarium Framework
Saturday, July 12, 2008PrintSubscribe
Creating Custom Action Handlers in Data Aquarium Framework Applications

Custom actions provide the easy way of implementing server code that is being invoked by dynamic AJAX user interface of Data Aquarium Framework applications. No AJAX or ASP.NET programming experience is required.

Suppose you have generated ASP.NET application based on Data Aquarium Framework with Code OnTime Generator for the Northwind database. If you run this web application and select Products in the drop down at the top of the page, and click on Actions menu option then a view similar to the one displayed in the picture will be displayed.

image

Let's write some custom server code, which will execute when the My Command action selected. We will learn how to implement custom server code that will validate the entered data just before it is submitted to the database. We will also write server code to invoke the client-side script to interact with the AJAX views.

Specifying Custom Actions

Open your project in Visual Studio 2008 or Visual Web Developer Express 2008, expand Controllers folder, and open Products.xml data controller descriptor. Scroll to the bottom of the file and find custom command with MyCommand argument.

image

This is the only entry, which is needed to have your custom command displayed on the action bar of the views managed by the Products data controller. Set up your own custom header text and description to reflect the purpose of the action.

You can create additional action groups with the scope of ActionBar, Form, and Grid. The ActionBar action are displayed as menu option in the action bar. The Form action is displayed as a button in the data entry form. The Grid action will be displayed as an option in the grid view row context menu, which pops up when you click on the drop down arrow next to the value in the first column of the row.

You can additional supply the context of previously executed command via whenLastCommandName attribute. For example, you might want certain actions to be available only when user has started editing the record, or when a new record is being created.

You can also specify user roles to automatically show/hide actions based on users security credentials. This feature is integrated with ASP.NET security infrastructure and required no coding at all.

Create Server Code to Handle Custom Actions

Add a class to the App_Code folder of your application. Specify that you are using Northwind.Data namespace if you have entered Northwind as a default namespace when you have generated the code with Code OnTime Generator. Also specify that the class will inherit it's functionality from the ActionHandlerBase class that is a part of Data Aquarium Framework.

image

Now we need to hook the custom action handler Class1 into the Data Aquarium Framework. Scroll to the top of the Products data controller file and enter the class name as a value of the actionHandlerType attribute as show in the picture.

image

Override the ExecuteAction method in Class1:

protected override void ExecuteAction(ActionArgs args, ActionResult result)
{
    if (args.CommandName == "Custom" && args.CommandArgument == "MyCommand")
        result.NavigateUrl = "http://www.microsoft.com";
}

If the action is selected in the form view then the current record information is provided in the action argument values. If your action has been specified in the scope of the grid then the current row field values are passed alone to your code.

image

Use command name and argument to process multiple actions within the same action handler. Last command name can also be of use if you need to further alter the action behavior.

Create Server Code to Handle Data Manipulation Actions

Let's add some data validation code to prevent users from making changes to some sensitive information that we care about. For example, we will raise an exception if a user is trying to change the Chai product.

Override the BeforeSqlAction method in the Class1. Notice that we are using Linq to query the values of the action arguments.

protected override void BeforeSqlAction(ActionArgs args, ActionResult result)
{
    if (args.CommandName == "Update")
    {
        string s = (string)(
            from c in args.Values
            where c.Name == "ProductName"
            select c.OldValue).First();
        if (s == "Chai")
            throw new Exception("Can't edit Chai");
    }
}

Locate the Chai record in the Products screen, change any field of the record, and select Save in the action bar, in the grid context menu, or in the form edit view. The following error message is displayed at the top of the screen to the end user.

image

If an exception is raised before the execution of the SQL command then the SQL command is canceled. You can also cancel command by invoking the Cancel method of result parameter. This may be useful if you would like to execute your own data update instead of relying on the automatic dynamic SQL generation feature of Data Aquarium Framework. You can use Values property of the action argument and inspect individual fields via their Name, Value, NewValue, and OldValue properties.

Create Server Code to Invoke Client Java Script

You can supply a custom client-side Java Script expression, which will be evaluated upon the completion of execution of your server code. This works for both custom and data manipulation actions.

Suppose you want to allow uses to enter multiple products with the minimum number of clicks. When user selects the New action from the action bar and enters the first product you want the data view to stay in the New Products form until the uses decides to cancel.

Enter the following method in the Class1.

protected override void AfterSqlAction(ActionArgs args, ActionResult result)
{
    if (args.CommandName == "Insert")
    {
        result.ClientScript = String.Format(@"
            alert('Product {0} has been created.');
            $find('{1}').executeCommand(
                {{commandName:'New',commandArgument: 'createForm1'}});",
            (from c in args.Values
             where c.Name == "ProductName"
             select c.NewValue).First(),
            args.ContextKey);
    }
}

Our custom code will kick in whenever the Insert command is executed and will assign a Java Script expression to be evaluated when the result is returned to the client-side data view. The alert method call will display a confirmation telling the user that the record has been created indeed. The $find method call will find the client side Ajax component identified by ContextKey passed in the action arguments. Method executeCommand belongs to the DataView JavaScript class and will execute the client side command New, which will result in the createForm1 view to be displayed again. From the user perspective the New Products form simply remains in place when the record creation confirmation is dismissed.

image

Conclusion

Exceptionally flexible server-side programming support in applications based on Data Aquarium Framework provides great number of customization options to programmers with any degree of experience with ASP.NET and AJAX.

It allows real separation of the business logic from the presentation.

Your web application sends asynchronous JSON requests to the stateless server application that are being processed with all the power of the Microsoft.NET framework without any need to know ASP.NET or AJAX programming techniques. Start being productive now.

Saturday, July 12, 2008PrintSubscribe
GUI of Data Aquarium Framework Applications

Let's review some of the many great features available in a typical application built with Data Aquarium Framework.

Paging and navigation

The pager is displayed below the grid of records. You can use Next and Previous links to advance from one page to another, or click on the page number to get to the desired page. The page size is controlled by Items per page section next to the pager. The default values are 10, 15, 20, and 25. You always know the current page range, which is currently displayed in the Showing section of the page. If your data has been edited, you can click Refresh in the bottom right corner.

Default view in Data Aquarium Framework application created with Code OnTime Generator for ASP.NET and AJAX

As you can see, the pager is very powerful and provides a great deal of control to the end user.

Sorting and Filtering

All data views support advanced filtering and sorting. Mouse over the column header and press the arrow for filtering and sorting options. You can alphabetically sort A-Z or Z-A by pressing Ascending or Descending, respectively. The distinct column value filters are listed, and selecting one will cause the record set to trim to the selection. Custom filtering with user-defined conditions is also available in most columns.

Sorting and filtering dropdown in Data Aquarium Framework application created with Code OnTime Generator for ASP.NET and AJAX

Once a filter is selected, the number of filter values in the other fields will reduce accordingly. Only available filter options are displayed, which is known as Adaptive Filtering. In the example below, the category is limited to Produce, and only shows suppliers that sell produce. All other fields are filtered in a similar fashion. If you wish to remove the filter, press Clear Filter.

Sorting and filtering in Data Aquarium Framework application created with Code OnTime Generator for ASP.NET and AJAX

When you select Custom Filter, a popup text box appears. Enter the full or partial sample value you wish to filter by, and press OK to filter. Cancel brings you to the previous screen. You can even add multiple sample values separated by commas, as in the example below. The >, <, >=, or <= operators can also be used to create a filter for numeric values. For example, if you enter >10,<50 in the unit price filter then only the products priced between $10 and $50 will be displayed.

Custom Filtering in Data Aquarium Framework application created with Code OnTime Generator for ASP.NET and AJAX

Editing Records

When you mouse over any row in the first column of the grid view, an arrow appears next to the field value. Click on it, and a drop down will extend. If you click on Select, it will lead you to the item's form view. If you click Edit, you can edit the item in place, and can change any of the fields displayed. This is convenient if you would like to work information in a spreadsheet fashion. Clicking Delete will cause the record deletion.

Option popup in Data Aquarium Framework application created with Code OnTime Generator for ASP.NET and AJAX

The next picture shows the selected row in the edit mode. You can now change any of the fields. For lookup values, a custom popup window shows up when you click on the field. Clicking on the eraser icon will reset the field to blank. For logical fields, drop downs are automatically generated. You can customize your application to display lookup values as drop downs, list boxes, and radio button lists. When you are finished, you can select the drop down arrow next to the field in the first column, and press Save to save all changes, or Cancel to go back without editing the entry. The same options are available on the action bar in the Record menu.

Edit mode for grid view in Data Aquarium Framework application created with Code OnTime Generator for ASP.NET and AJAX

In the picture below, you can see a custom lookup control for the Suppliers lookup field. You can page through the suppliers, set the number of records per page, and even sort and filter, as is available in the main grid view. Click on a link in the first column to select the supplier, or press Close to exit without changes. The escape key will also cancel the window.

Sorting and filtering in the custom lookup control in Data Aquarium Framework application created with Code OnTime Generator for ASP.NET and AJAX

You can also click on an item to go to the form view. Here, you can go into edit mode by pressing Edit, or delete the record by pressing Delete. The Close button brings you back to the previous screen. You can also select Products in the View drop down to go back, as shown in the picture. The New menu option on the action bar in the top left corner allows you to enter a new record into the database.

Form View in Data Aquarium Framework application created with Code OnTime Generator for ASP.NET and AJAX

Notice when you try to delete an item that already has orders, an error message appears and remains in position even if you scroll up or down. Upon your next button press, this message will disappear.

Deletion error message in Data Aquarium Framework application created with Code OnTime Generator for ASP.NET and AJAX

The lookup controls in the form view work the same way as when you edit the item in the grid view. Paging, sorting, and filtering in the lookup windows will work as well. Notice that in lists with a small number of records, the paging options are automatically hidden. You can see that in the Categories lookup window in the picture below.

Lookup window in Data Aquarium Framework application created with Code OnTime Generator for ASP.NET and AJAX

Custom Actions

At the top of the web app, there is a bar with several buttons. The New option allows you to create new records. The View button allows you to change your view. The Actions option can contain custom commands. If you need more buttons to be placed or to code your buttons differently, you can easily add and edit them by editing the generated data controller descriptors with your favorite code editor, such as Microsoft Visual Studio. Visual Studio also provide full intelli-sense support for data controllers.

Action Bar in Data Aquarium Framework application created with Code OnTime Generator for ASP.NET and AJAX

Creating a New Record

Creating a new record is a simple affair. All that is required is to select New [Record Type] from the New drop down. You will be taken to new record form view, which contains all editable fields. You can type in values, bring up a lookup control for lookup values, and select an option from a drop down on the fields that require you to do so. Once complete, press OK to create your new record, or Cancel to go back to the previous screen without saving.

New record form view in Data Aquarium Framework application created with Code OnTime Generator for ASP.NET and AJAX

The new record will be displayed and highlighted upon pressing OK. If you decide you want to page away, your selected record will remain highlighted and the filters and sorting will remain preserved, should you choose to return. This also occurs if you edit or view an item and return. This allows for easy and fast data input.

Highlighted new record in Data Aquarium Framework application created with Code OnTime Generator for ASP.NET and AJAX

This is just a short preview of some of the great user interface features that Data Aquarium Framework has to offer. Find more useful resources on our support page.

Thursday, May 29, 2008PrintSubscribe
Data Aquarium Framework

Nothing is simpler today than publishing a database on the web. A third generation of ASP.NET provides countless tools and components that assist you with this task. Yet, every time you work on your next database web application a thought comes to mind - why is it so difficult to make your data look good on the web?

Sure, you can throw in a data source and a few data presentation controls to have a quick and dirty web form in just a few minutes. Next you have to change the page layout, handle user validation errors, apply better styling, customize columns and fields, create additional pages to have a data lookup grid. By the end of the day you have a sizable chunk of code, which grows up from virtually nothing. Then you are bracing yourself to hear user requests to add a few data filters and have the screen look different to each user role.

Does it have to be that way?

Naturally you are looking for advanced commercial controls and components to ease the pain. You are rarely getting a real relief. Instead you are obtaining a pretty face for you forms at the expense of a bloated code.

Sometimes there is nothing you can do about it. Your web form simply requires a very high level of customization and you have to deal with it. But this is not the case for most of your web projects.

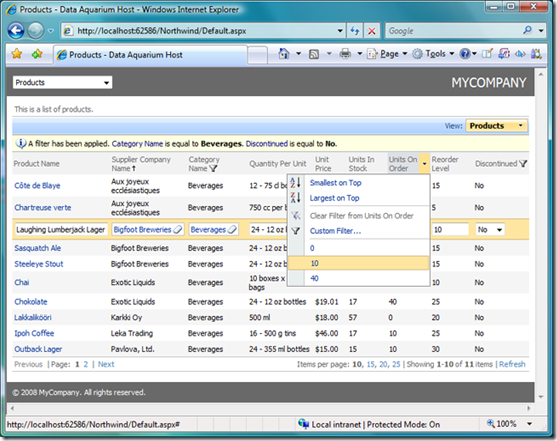
A better approach is needed. Let's consider a better way to create database web forms. Let's make them look like the one in the picture.

See the live Demo now

First, you start with SQL query. A simple SELECT statement that joins together a database table with the linked lookups will provide a method of obtaining a real world object entity, which is supposed to be displayed in a web form.

select "Products"."ProductID" "ProductID" ,"Products"."ProductName" "ProductName" ,"Products"."SupplierID" "SupplierID" ,"Supplier"."CompanyName" "SupplierCompanyName" ,"Products"."CategoryID" "CategoryID" ,"Category"."CategoryName" "CategoryCategoryName" ,"Products"."QuantityPerUnit" "QuantityPerUnit" ,"Products"."UnitPrice" "UnitPrice" ,"Products"."UnitsInStock" "UnitsInStock" ,"Products"."UnitsOnOrder" "UnitsOnOrder" ,"Products"."ReorderLevel" "ReorderLevel" ,"Products"."Discontinued" "Discontinued" from "dbo"."Products" "Products" left join "dbo"."Suppliers" "Supplier" on "Products"."SupplierID" = "Supplier"."SupplierID" left join "dbo"."Categories" "Category" on "Products"."CategoryID" = "Category"."CategoryID"

You may have a few queries with the same columns, but have them return a different subset of records by adding the WHERE clause, and various sorting options via the ORDER BY clause. This will give alternative views to your entity, which in this case is Products from the Northwind sample database that comes with Microsoft SQL Server.

A wealth of information is available in this query. You know the base table name ("dbo"."Products"), the list of columns, the where and order by sections if any. This informati0n allows to automatically construct UPDATE, INSERT, and DELETE statements when the time comes to update the database. You may also select distinct column values, apply additional filters to the where clause, or alter the query to change the sort order of rows.

The class Regex from System.Text.RegularExpressions namespace will help with that.

Second, create an inventory of all fields returned by SELECT query. It may look like the one displayed below. Such inventory can be stored in XML file along with query itself.

NameTypeAllow NullsPrimary KeyLabelRead OnlyDefaultLookup
ProductIDInt32NoYesProduct#No
ProductNameStringNoNoProduct NameNo
SupplierIDInt32YesNoSupplier# No
SupplierCompanyNameStringYesNoSupplier Company NameYes Supplier
CategoryIDInt32YesNoCategory#No
CategoryCategoryNameStringYesNoCategory NameYes Category
QuantityPerUnitStringYesNoQuantity Per UnitNo
UnitPriceDecimalYesNoUnit PriceNo((0))
UnitsInStockInt16YesNoUnits In StockNo((0))
UnitsOnOrderInt16YesNoUnits On OrderNo((0))
ReorderLevelInt16YesNoReorder LevelNo((0))
DiscontinuedBooleanNoNoDiscontinuedNo((0))

This inventory is invaluable in generating SQL statements to read and write the database information. It is also suitable to use as a design document when you start creating a database web form. If the field inventory is stored in XML format then you can use XPath expressions to easily lookup required information just in time when you need it.

Third, define presentation views on top of the field inventory. Not all of the fields are displayed in all views of a typical web form. You can greatly simplify control of the GUI presentation by listing views with data fields that are actually displayed to the user.

In our example, you may define one grid view to present a list of record, a form view to display a single record in the edit mode, and another form view that will allow user to add new records. You can see the grid view in action in the picture above.

ViewTypeField NameAlias Field NameColumnsData Format String
grid1GridProductName 40
SupplierIDSupplierCompanyName
CategoryIDCategoryCategoryName
QuantityPerUnit 20
UnitPrice 15c
UnitsInStock 15
UnitsOnOrder 15
ReorderLevel 15
Discontinued
editForm1FormProductName 40
SupplierIDSupplierCompanyName
CategoryIDCategoryCategoryName
QuantityPerUnit 20
UnitPrice 15c
UnitsInStock 15
UnitsOnOrder 15
ReorderLevel 15
Discontinued
createForm1FormProductName 40
SupplierIDSupplierCompanyName
CategoryIDCategoryCategoryName
QuantityPerUnit 20
UnitPrice 15c
UnitsInStock 15
UnitsOnOrder 15
ReorderLevel 15
Discontinued

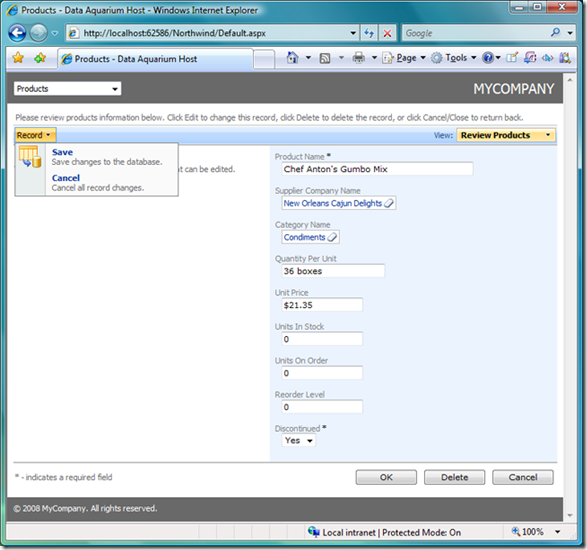
Use Microsoft Ajax Extensions to create an AJAX component to render this data as HTML. Spruce it up with some Ajax Control Toolkit goodies to enhance the presentation. You will also need to deliver the views and fields information to this component via a call to a JSON-enabled web service, which can be done with the tools that Visual Studio 2008 provides out of the box. Here is the editForm1 in action.

editForm1 in action

Fourth, define a state machine for your form. The most time consuming process in web form development is figuring out the logic of the screen mode changes. Considerable amount of code may need to be written to cope with the data validation errors, unpredictable user actions, such as clicking on the browser's Back button, and other such events.

AJAX components are generally tolerant to the evil Back button. But AJAX techniques along are not solving the problem.

Consider implementing a state machine that allows a flow of screen mode changes in the context of the previously executed command. Make sure to break down the flow by the context. For example, in our example we have commands specific to a grid view row, commands displayed in the action bar, and a row of push buttons displayed in forms.

ScopeLast CommandCommandArgumentHeader Text
Grid SelecteditForm1
Edit
Delete
EditUpdate Save
EditCancel
Form Edit
Delete
Cancel Close
EditUpdate OK
EditDelete
EditCancel
NewInsert OK
NewCancel
Action Bar NewcreateForm1
CustomExportCsvExport to Spreadsheet
CustomExportRsvView RSS Feed
CustomMyCommandMy Command
EditUpdateSave
EditCancel

Implement this state machine within the AJAX component that is responsible for user interface and you are done.

Data Aquarium Framework implements the steps described above and can be used as a foundation of your own project. A few source code files that provide server-side plumbing and a simple Data Controller web service that serves as gateway for the Data View client-side AJAX component allow for a simple Model-View-Controller implementation, which works great in many scenarios.

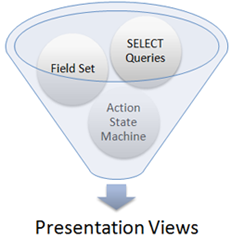
You can download the sample of the XML data controller descriptor. The data controller descriptor design can be illustrated by the following picture.

Data-Controller-Descriptor

Data Aquarium Framework is a premium project that comes with Code OnTime Generator. The entire framework source code is included in the generated source code. Feel free to make any adjustments and get your database web forms done faster.

Download Code OnTime Generator here.

You can see the application built with Data Aquarium Framework in action right in this page if you scroll to the bottom.